PROJECT: TravelBuddy
1. Overview
This document serves to highlight my contributions to TravelBuddy, a travel journaling application.
TravelBuddy gives travelers simple tools to pen down their trip details. As every journal entry in TravelBuddy is a Place, travelers can also include a photo, rate the place out of 5 stars, tag the Place with custom tags, and pen down other personal information about the place, breathing life into an otherwise lifeless application.
TravelBuddy also gives travelers the means to make sense of their data, via simple data visualization. Together with intuitive search functionality, TravelBuddy also gives travelers new insights about their adventures.
TravelBuddy was built as part of the CS2103 Software Engineering module in the National University of Singapore, in which my team and I were tasked to morph an existing Address Book software product, and turn it into a new product — TravelBuddy. The full source code for TravelBuddy is available here.
2. Summary of Contributions
This section gives an overview of my contributions to the development and testing of the software. A more detailed sample of my contributions to the User Guide and Developer Guide can be found below in Section 3, “User Guide Contributions” and Section 4, “Developer Guide Contributions” .
2.1. Major Enhancement: Photo Functionality
Photo functionality refers to the ability to include an image file with a user-defined Place. This functionality includes the ability to:
-
Add a photo to a Place
When using theaddcommand to add a Place, users can specify the absolute file path of their desired photo with ap/prefix. The photo will then be displayed at the top of the expanded Place view. -
Replace the existing photo of a Place
Using theeditcommand, users can specify the file path of a new photo with thep/prefix. The existing photo will then be replaced with the new photo at the top of the expanded Place view.
Justification: Photographs spark memories and invoke feelings; they are an indispensable part of any travel journal.
Photos also serve to complement the existing textual information about a Place. A 5-star rating of a restaurant may not mean much on its own, but when paired with the mouth-watering photo of a juicy leg of lamb, its impact is enhanced.
Highlights: The nature of this enhancement requires updates in and integration with multiple components, more below:
-
Logic- Photos are attached to Places via theaddcommand and replaced via theeditmethod.
Hence, changes toaddParserandParserUtilwere also needed to take into account thep/prefix. -
Model- Extensive changes to theModelwas needed to include the Photofilepathstring. -
Storage- Thefilepathstring must be stored in a new field withinTravelBuddy.json. -
UI(User Interface) - If an included photo is present, it must be displayed in the expanded Place view. Otherwise, no image is displayed.
Code contributed to major enhancement: [RepoSense] [Functional code]
2.2. Minor Enhancement: View Switching between Place view and Chart view
On calling the generate command, the Chart view is displayed to the user. On calling the select command, the expanded Place view is displayed to the user.
Justification: Splitting the usable User Interface (UI) space into half, one for Chart and another for an Expanded Place details, reduces the screen real estate for both.
The use of generate and select commands to change views provides full real estate for both features. Chart view can subsequently accommodate more charts,
while Expanded Place view can display more information while providing a pleasant User Experience.
Highlights: A robust event-handling system like above requires updates to multiple components involved in the Model-View-Controller pattern:
-
Model- AnObservableproperty is needed to reflect the view state. -
Logic- The helper methods of theObservableproperty require implementation. -
UI(User Interface) - A parent panel is needed to house both the Chart view panel and the Expanded Place view panel. It also needs to be responsible for view switching.
Code Contributed: [Functional code]
2.3. Other Contributions:
This section gives a sample overview of other miscellaneous contributions to TravelBuddy.
3. User Guide Contributions
Given below are my contributions to the User Guide. They demonstrate my ability to write documentation targeting end-users. |
3.1. Including a photo when adding a place with p/
Description: The add command can also attach a single photo
when adding a new place to TravelBuddy.
The photo must be an image file that already exists in your computer.
Format:
Parameter |
Parameter Prefix |
Specific Input Format |
|
|
The file path must be an absolute file path and include the filename and file extension. |
A filepath specifies a unique location for a file.
Absolute file paths are paths that start with a drive letter (eg. C:\)
|
Examples: Given below is an example that uses the add command to include
a photo with the p/ parameter:
-
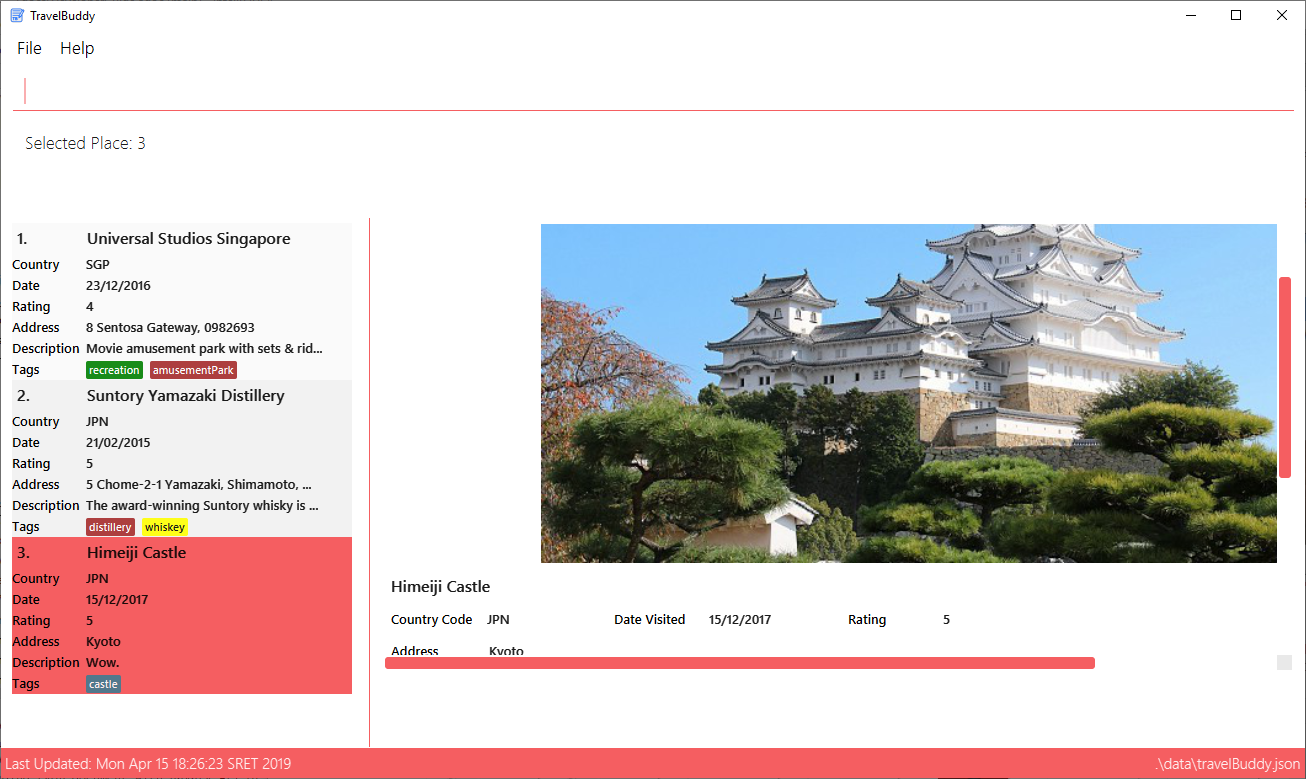
add n/Himeiji Castle cc/JPN dv/15/12/2017 r/5 d/Wow. a/Kyoto t/castle p/C:\Users\Michael\Pictures\castle-photo.jpg
Adds Himeiji Castle as a place in TravelBuddy, and include the image castle-photo.jpg at the location specified by
the filepath C:\Users\Michael\Pictures\castle-photo.jpg.
Figure 4.3.1.1 below shows TravelBuddy before the above example command is executed.
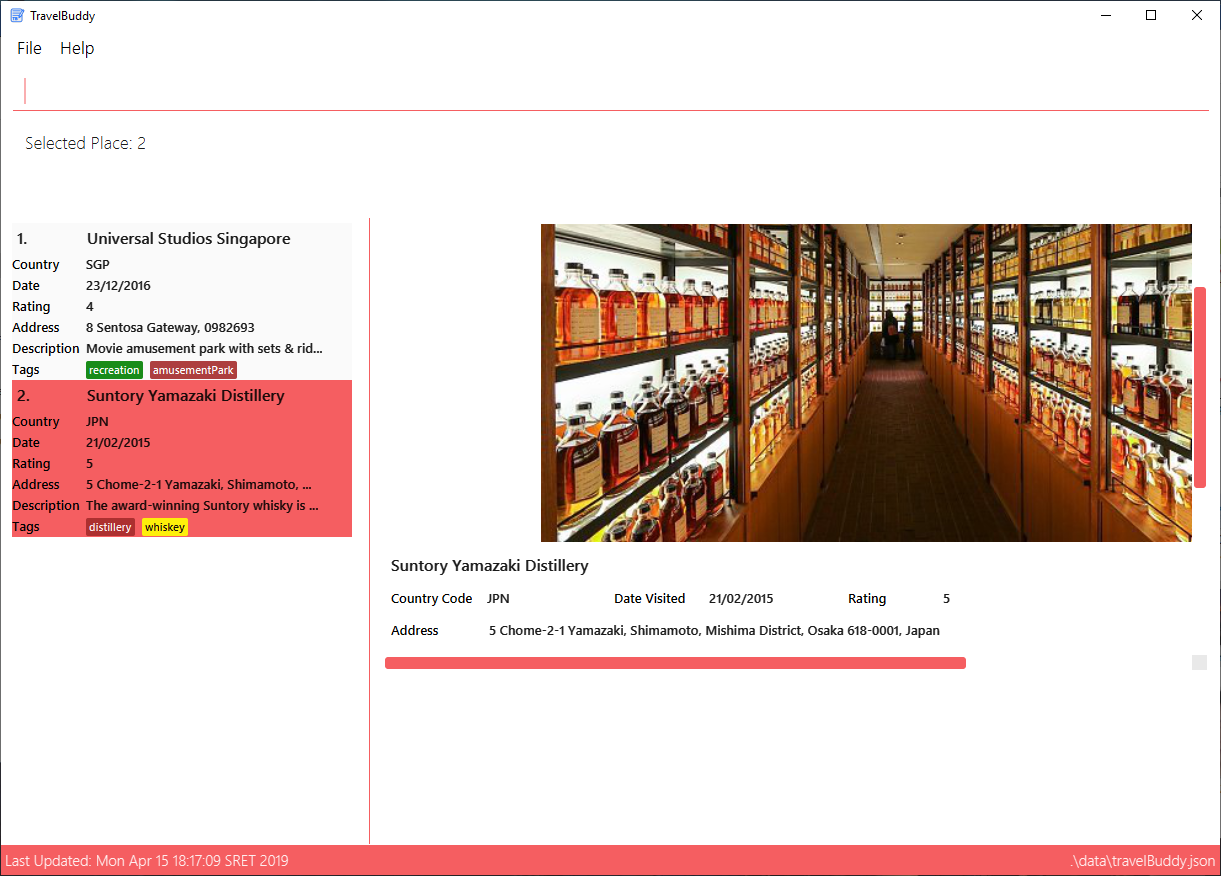
add command is executed.Figure 4.3.1.2 below shows TravelBuddy after the above example command is executed, and the newly added "Himeiji Castle" is selected.
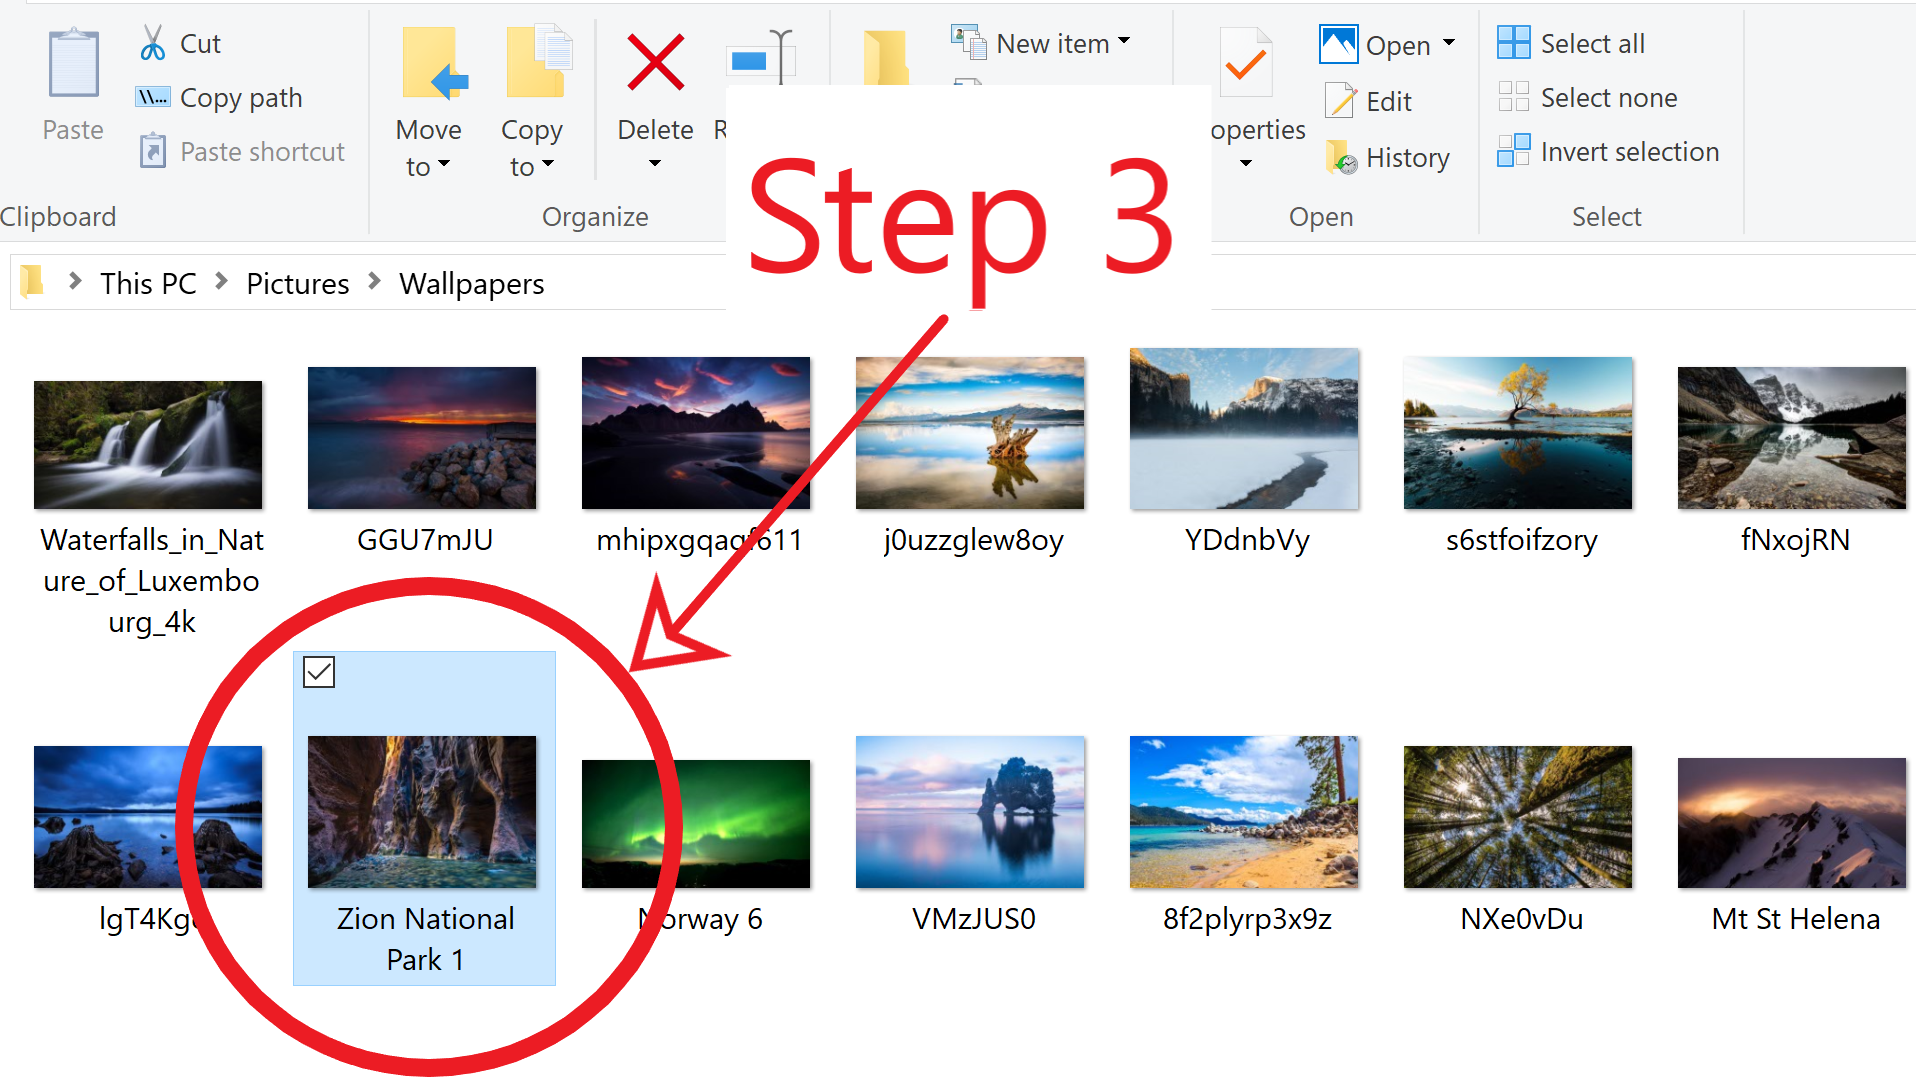
add command is executed and the newly added "Himeiji Castle" is selected.| If you are using Windows 10, below is a quick way to obtain the file path of the photo you would like to include: |
-
Step 1: Open File Explorer.
-
Step 2: Navigate to the folder that contains the photo you would like to add.
-
Step 3: Select the Photo you would like to add.
-
Step 4: Click on
Copy Pathat the top left corner of the File Explorer window.
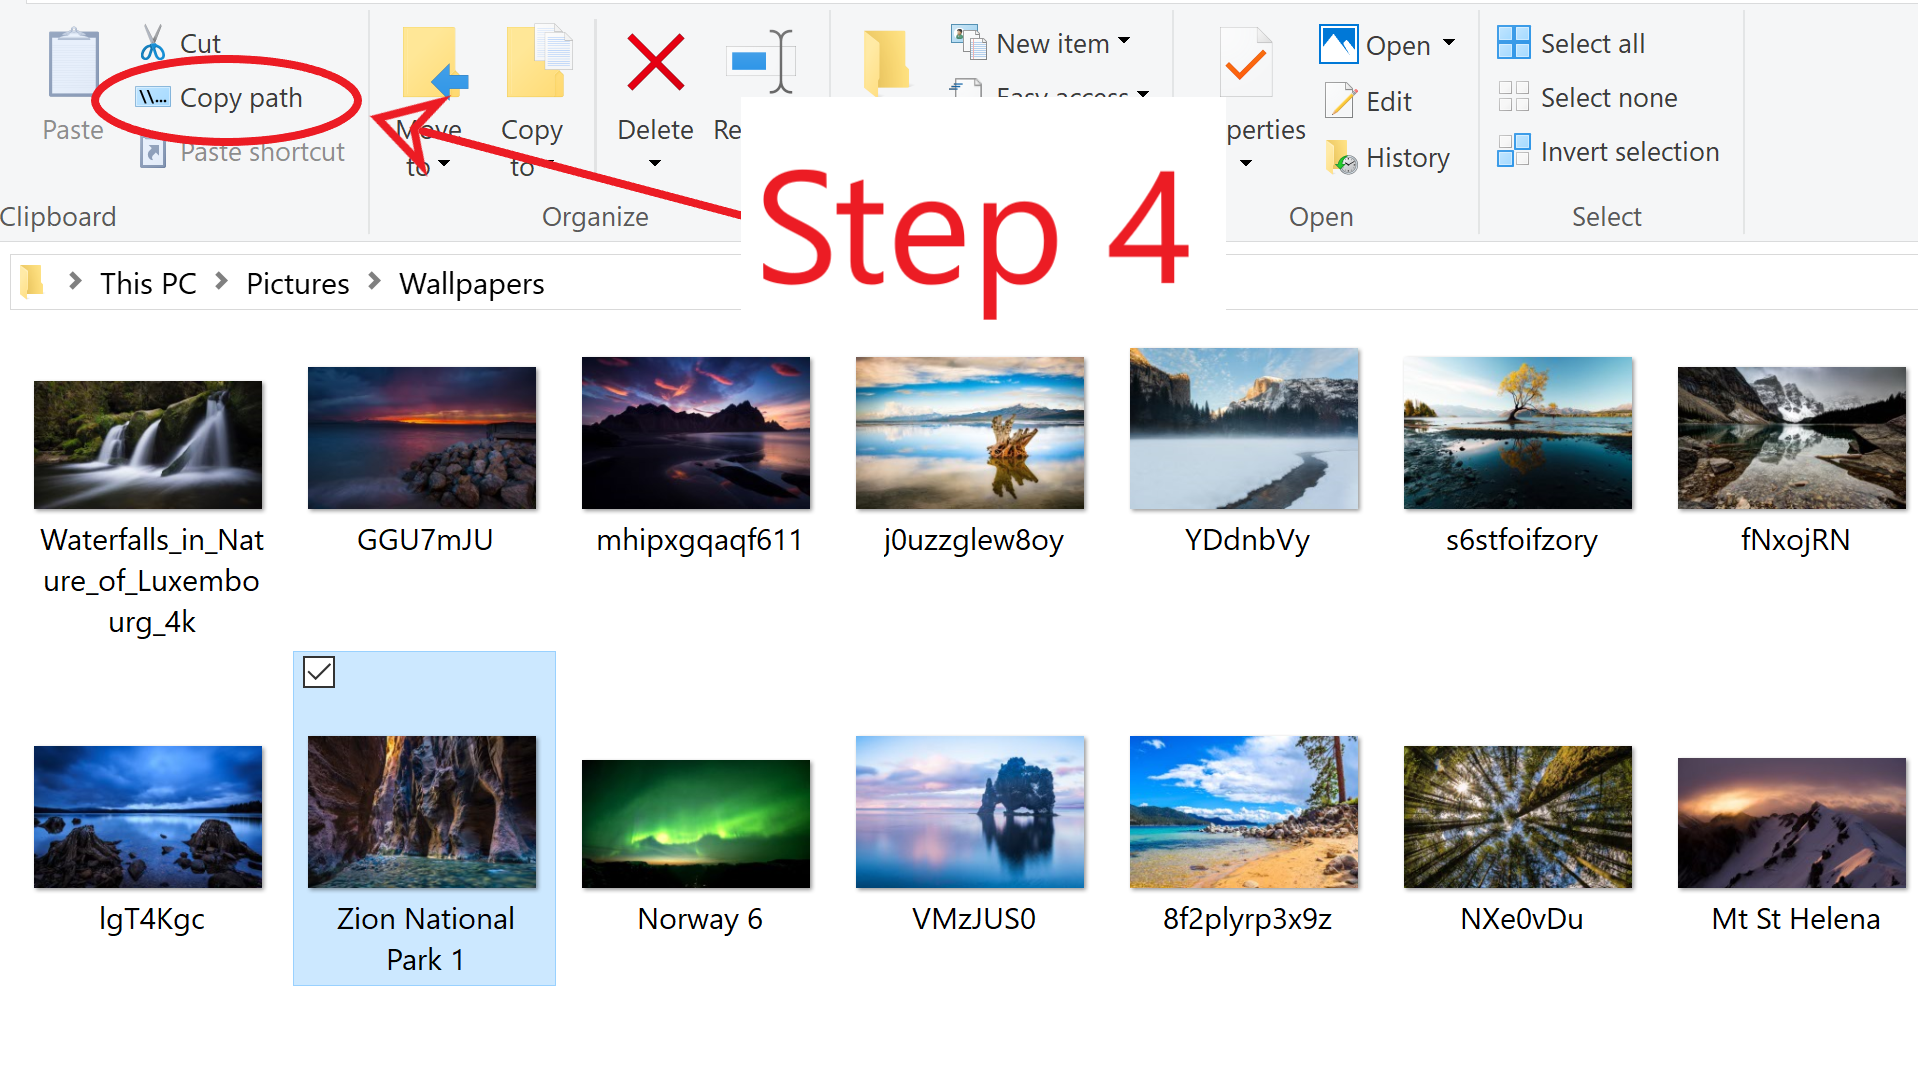
Copy Path at the top left corner File Explorer window-
Step 5: Open TravelBuddy and paste the filepath after the parameter prefix
p/.
| TravelBuddy allows for double quotation marks around the filepath, so there is no need to delete them. |
Currently, TravelBuddy supports the following image file formats/extensions:
-
JPEG
.jpg -
PNG
.png -
Bitmap
.bmp
4. Developer Guide Contributions
Given below are my contributions to the Developer Guide. They demonstrate my ability to write technical documentation targeting software developers. |
4.1. UI Component
API :
Ui.java
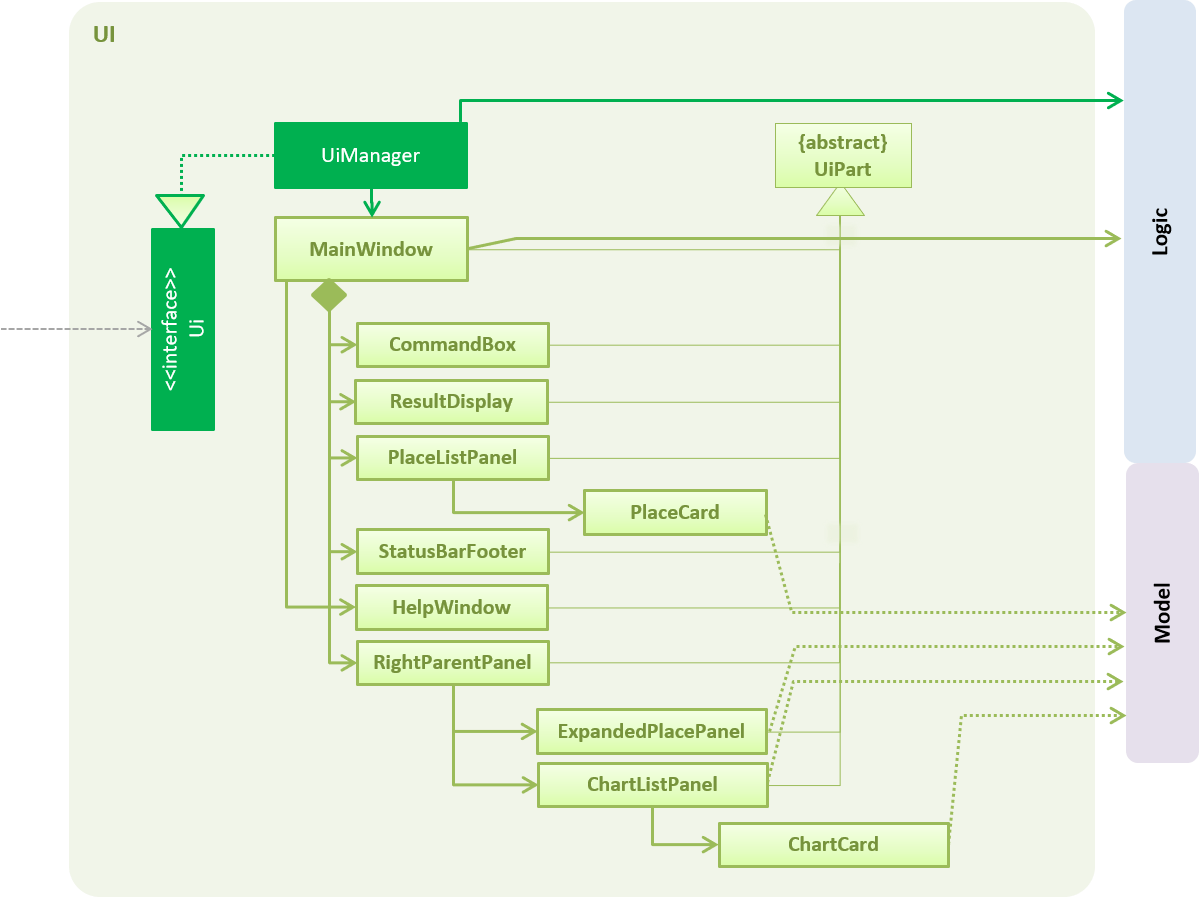
The UI component, as seen in Figure 3.2.1, uses the JavaFX UI framework. The layout of these UI parts are defined in matching .fxml files that are in the src/main/resources/view folder. For example, the layout of the MainWindow is specified in MainWindow.fxml
The UI component controllers are found in the src/main/java/seedu/travel/ui folder. Each class corresponds to a
specific .fxml file.
The UI component,
-
Executes user commands using the
Logiccomponent. -
Listens for changes to
Modeldata so that the UI can be updated with the modified data.
The UI consists of a MainWindow that is made up of various parts specified below.
All parts inherit from the abstract UiPart class.
Brief overview of each UI component:
MainWindow: Consists of the main menu with File and Help dropdowns and the remaining UI parts below.
-
HelpWindow: Webview to display UserGuide.html -
CommandBox: Directly below the main menu, CLI displayed here -
ResultDisplay: Displays CLI feedback to user, (eg.Unknown command,Invalid command format!) -
StatusBarFooter: At the bottom of MainWindow, reports the status of the TravelBudy application -
PlaceListPanel: On the left of the application, displays Places as a VBox ofPlaceListCards-
PlaceListCard: Labels for the Display index and Place data fields (CountryCode,Ratingetc.) in a VBox the left, Labels that display Name and actual Place data (CountryCode,Ratingetc) in a VBox on the right
-
-
RightParentPanel: Parent panel for both
ChartListPanelandExpandedPlacePanel, contains helper methods for switching functionality, interacts withModelandLogic-
ChartListPanel: Parent panel for analytics of all Places, thegeneratecommand displays this panel-
ChartCard: DisplaysChartdata in a bar graph
-
-
ExpandedPlacePanel: Displays an expanded view of all Place data, including thePhoto
-
-
BrowserPanel: Deprecated. Opens on clicking the PlaceListCard, on the right of the PlaceListPanel
*All CSS code can be found in LightTheme.css and Extensions.css
4.2. Photos Feature
The Photo feature gives users the ability to attach an existing image file to any Place object,
which is then displayed in the ExpandedPlacePanel when the select command is called on a particular Place.
4.2.1. Current Implementation
This feature is currently integrated as part of the add and edit commands. It works by accepting the user-entered
absolute file path of the image as an add or edit command parameter, specified by the prefix p/.
Figure 4.4.1.1 below is a sequence of steps, illustrating the interaction between various classes when the add command is used to include a photo with a newly created place.
Step 1: The user enters the command add n/Himeiji Castle cc/JPN dv/15/12/2017 r/5 d/Wow.
a/Kyoto t/castle p/C:\Users\Shaun\Pictures\castle-photo.jpg.
Step 2 - 5: Identical to add command sequence steps 2 - 5, please refer to [Add Feature] for details
Step 6: The AddCommandParser interprets the arguments, and checks the file path input using ParserUtil.parsePhoto().
Step 7: parsePhoto() then trims any leading whitespaces. It also trims a single leading and trailing double quotation mark ".
This is for ease of use with the Windows 10 File Explorer Copy Path Home menu function, which returns the filepath of the selected file
wrapped with double quotation marks ".
Step 8.1: As the photo parameter is optional for add command, if photo prefix p/ is not used, AddCommandParser
calls the 2nd overloaded Place() constructor to create a Place with a special string EMPTY_PHOTO_PATH in the Photo attribute.
Step 8.2:
-
If photo prefix
p/is used, he validity of the filepath is then checked with thePhoto.isValidPhotoFilepath()method. The method relies on usingImageIO.read()to try opening the file using the providedfilepathstring. If the filepath is invalid or the file cannot be opened, thenImageIO.read()throws aIOException. The exception is caught, control returns toparsePhoto()and aParseException is thrown.
    public static boolean isValidPhotoFilepath(String test) {
        if (!(test instanceof String)) {
            throw new NullPointerException();
        }
        try {
            File testPhoto = new File(test);
            Image image = ImageIO.read(testPhoto);
            FileInputStream testStream = new FileInputStream(testPhoto);
            if (image == null) {
                System.out.println("The file " + testPhoto + " could not be opened, it is not an image");
                return false;
            }
        } catch (IOException e) {
            return false;
        }
        return true;
}-
Else, control returns to
parseUtil.parsePhoto(). It uses the all-parameterPlace()constructor to create aPlaceobject, using thePhotoparameter and other parameters.
A valid filepath must be an absolute file path; it starts with the drive-letter (eg. C:\\), and ends with the file name and extension (eg. castle-photo.jpg).
Supported filepaths are .jpg .png and .bmp, which are filepaths supported by ImageIO.read() and the Java Image class.
|
Step 9: When the select command is executed, the UI component ExpandedPlacePanel receives the Place object. It then uses the photo.filepath attribute to create a
JavaFX Image object, which is then displayed in a ImageView panel at the top of ExpandedPlacePanel using the setImage() method.
Example: Using add to include a photo
Given below is an example usage scenario and what the user will see in the GUI.
Step 1. Input add n/Himeiji Castle cc/JPN dv/15/12/2017 r/5 d/Wow. a/Kyoto t/castle p/C:\Users\Michael\Pictures\castle-photo.jpg
add command is executedStep 2. The user inputs selects 4.
add command is executed and the newly added Place "Himeiji Castle" is selected4.2.2. Design Considerations
Decision: What type of file path input should the add and edit command accept for the photo parameter (prefix p/)?
| Implementation 1: Absolute Filepath (current choice) |
Implementation 2: Filename and Extension Only | |
|---|---|---|
Description |
Accept the entire absolute file path of the image to be added/replaced |
Accept only file name and file extension of the image to be added/replaced, but requiring the images to be located in the directory of the JAR executable, or some other pre-defined directory. |
Pros |
Ease-of-use. This approach is more user friendly when used together with Windows 10 File Explorer |
Scalability. This approach is does not require images to be copied or moved from their existing directory to a new directory. Instead, by using
|
Cons |
Ease-of-use. This approach is less user-friendly as users will have to manually type in the name and extension of each image file added, |
Scalability. For a large number of image files, this approach requires the user spent extra time moving files from their existing directory to
the new pre-specified directory. If moving files is not an option, then addition storage space is required for all the copied files. |