By: CS2103T W11-3 Team Since: Feb 2019 Licence: MIT
1. Introduction
Welcome to TravelBuddy's Developer Guide, put together by Chung Ming, Prem, Niven and Shaun. In this guide, you will find all the relevant information to get you familiarize with TravelBuddy’s design and implementation.
2. Setting Up
Before we begin, here is a quick guide on how you can set up your machine to optimize the performance of TravelBuddy.
2.1. Prerequisites
There are two installations that you need to take note of. They are:
-
Install JDK version
9or laterFor Windows developers, Java version 10will fail to run tests in headless mode due to a JavaFX bug. Therefore, we strongly encourage all Windows developers to stick with JDK version9. -
Install IntelliJ IDE
By default, IntelliJ already has both Gradle and JavaFX plugins installed. As TravelBuddy will be making use of them, please do not disable them. If you have disabled them, go to File>Settings>Pluginsto re-enable them.
2.2. Setting Up the Project in Your Computer
For this section, we will integrate JDK, IntelliJ and GitHub with TravelBuddy, before compiling it using Gradle. The steps are listed below:
-
Go to this repo, fork it first before cloning it. Fork it again to your computer.
-
Open IntelliJ (if you are not in the welcome screen, click
File>Close Projectto close the existing project dialog first) -
Set up the correct JDK version for Gradle
-
Click
Configure>Project Defaults>Project Structure -
Click
New…and find the directory of the JDK
-
-
Click
Import Project -
Locate the
build.gradlefile and select it. ClickOK -
Click
Open as Project -
Click
OKto accept the default settings -
Open a console and run the command
gradlew processResources(Mac/Linux:./gradlew processResources). It should finish with theBUILD SUCCESSFULmessage.
This will generate all resources required by the application and tests. -
Open
MainWindow.javaand check for any code errors-
Due to an ongoing issue with some of the newer versions of IntelliJ, code errors may be detected even if the project can be built and run successfully
-
To resolve this, place your cursor over any of the code section highlighted in red. Press ALT+ENTER, and select
Add '--add-modules=…' to module compiler optionsfor each error
-
-
Repeat this for the test folder as well (e.g. check
HelpWindowTest.javafor code errors, and if so, resolve it the same way)
2.3. Verifying the Setup
-
Run the
seedu.travel.MainAppand try a few commands -
Run the tests to ensure they all pass.
2.4. Configurations to do Before Writing Code
2.4.1. Configuring the Coding Style
This project follows the OSS-Generic Java Coding Standard. IntelliJ’s default style is mostly compliant with ours but it uses a different import order from ours. To rectify,
-
Go to
File>Settings…(Windows/Linux), orIntelliJ IDEA>Preferences…(macOS) -
Select
Editor>Code Style>Java -
Click on the
Importstab to set the order-
For
Class count to use import with '*'andNames count to use static import with '*': Set to999to prevent IntelliJ from contracting the import statements -
For
Import Layout: The order isimport static all other imports,import java.*,import javax.*,import org.*,import com.*,import all other imports. Add a<blank line>between eachimport
-
Optionally, you can follow the UsingCheckstyle.adoc document to configure Intellij to check style-compliance as you write code.
2.4.2. Setting Up CI
Set up Travis to perform Continuous Integration (CI) for your fork. See UsingTravis.adoc to learn how to set it up.
After setting up Travis, you can optionally set up coverage reporting for your team fork (see UsingCoveralls.adoc).
| Coverage reporting could be useful for a team repository that hosts the final version but it is not that useful for your personal fork. |
Optionally, you can set up AppVeyor as a second CI (see UsingAppVeyor.adoc).
| Having both Travis and AppVeyor ensures your App works on both Unix-based platforms and Windows-based platforms (Travis is Unix-based and AppVeyor is Windows-based) |
2.4.3. Getting started with coding
When you are ready to start coding, get some sense of the overall design by reading Section 3.1, “Architecture”.
3. Design
This section provides a high-level overview of overall architecture of TravelBuddy, including the design and structure of components and their constituent classes.
3.1. Architecture

Figure 3.1.1 above explains the high-level design of TravelBuddy. Given below is a quick overview of each component.
The .pptx files used to create diagrams in this document can be found in the
diagrams folder. To update a diagram, modify the diagram in the pptx file,
select the objects of the diagram, and choose Save as picture.
|
Main has only one class called MainApp. It is responsible for,
-
At app launch: Initializes the components in the correct sequence, and connects them up with each other.
-
At shut down: Shuts down the components and invokes cleanup method where necessary.
Commons represents a collection of classes used by multiple other components.
The following class plays an important role at the architecture level:
-
LogsCenter: Used by many classes to write log messages to TravelBuddy’s log file.
The rest of TravelBuddy consists of four components:
Each of the four components
-
Defines its Application Programming Interface (API) in an
interfacewith the same name as the component. -
Exposes its functionality using a
{Component Name}Managerclass.
For example, the Logic component, as seen in the class diagram in Figure 3.1.2, defines it’s API in the Logic.java interface and exposes its functionality using the LogicManager.java class.

How the architecture components interact with each other
The sequence diagram, as seen in Figure 3.1.3, below shows how the components interact with each other for the scenario where the user issues the command delete 1.
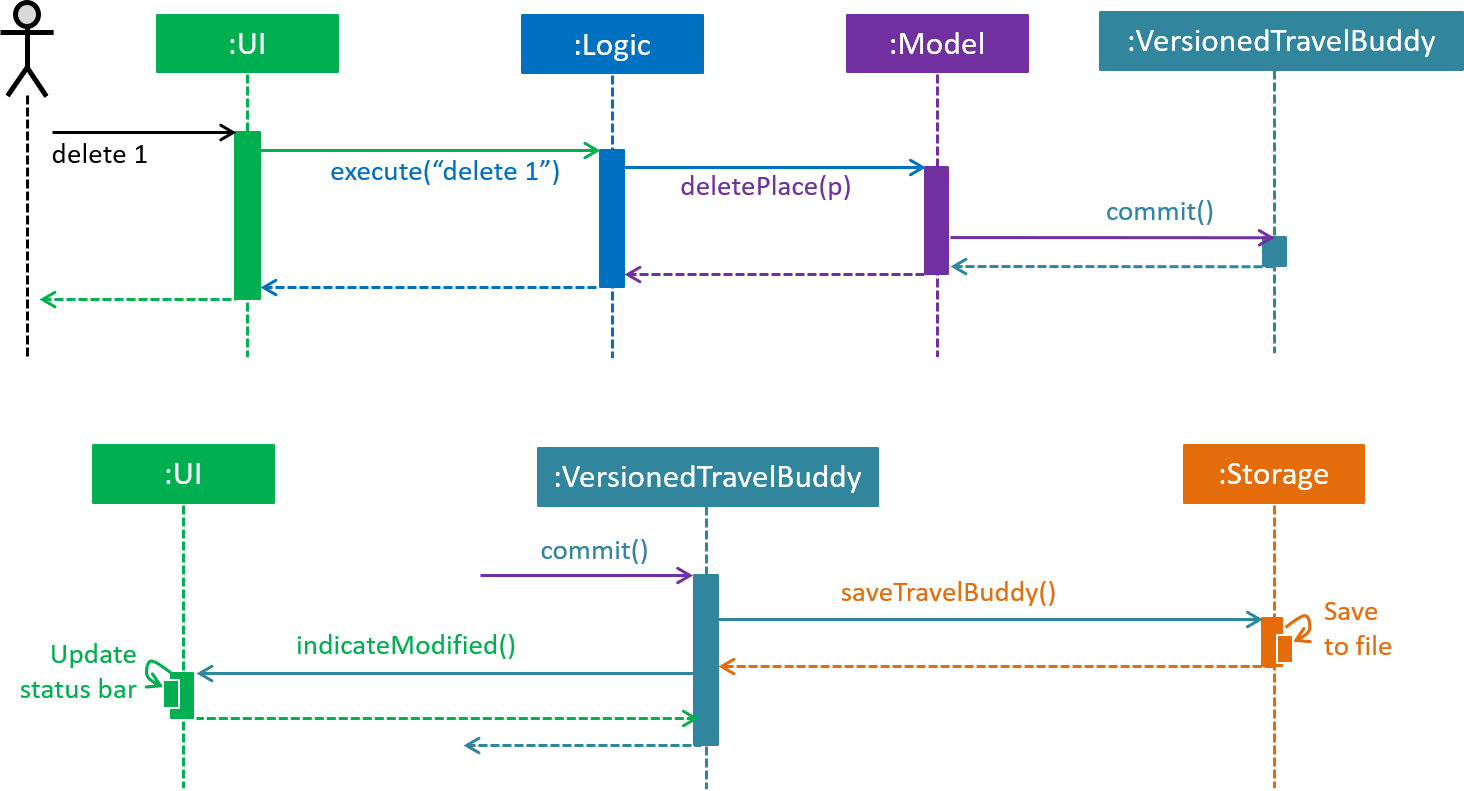
delete 1 commandThe sections below give more details of each component.
3.2. UI Component
API :
Ui.java

The UI component, as seen in Figure 3.2.1, uses the JavaFX UI framework. The layout of these UI parts are defined in matching .fxml files that are in the src/main/resources/view folder. For example, the layout of the MainWindow is specified in MainWindow.fxml
The UI component controllers are found in the src/main/java/seedu/travel/ui folder. Each class corresponds to a
specific .fxml file.
The UI component,
-
Executes user commands using the
Logiccomponent. -
Listens for changes to
Modeldata so that the UI can be updated with the modified data.
The UI consists of a MainWindow that is made up of various parts specified below.
All parts inherit from the abstract UiPart class.
Brief overview of each UI component:
MainWindow: Consists of the main menu with File and Help dropdowns and the remaining UI parts below.
-
HelpWindow: Webview to display UserGuide.html -
CommandBox: Directly below the main menu, CLI displayed here -
ResultDisplay: Displays CLI feedback to user, (eg.Unknown command,Invalid command format!) -
StatusBarFooter: At the bottom of MainWindow, reports the status of the TravelBudy application -
PlaceListPanel: On the left of the application, displays Places as a VBox ofPlaceListCards-
PlaceListCard: Labels for the Display index and Place data fields (CountryCode,Ratingetc.) in a VBox the left, Labels that display Name and actual Place data (CountryCode,Ratingetc) in a VBox on the right
-
-
RightParentPanel: Parent panel for both
ChartListPanelandExpandedPlacePanel, contains helper methods for switching functionality, interacts withModelandLogic-
ChartListPanel: Parent panel for analytics of all Places, thegeneratecommand displays this panel-
ChartCard: DisplaysChartdata in a bar graph
-
-
ExpandedPlacePanel: Displays an expanded view of all Place data, including thePhoto
-
-
BrowserPanel: Deprecated. Opens on clicking the PlaceListCard, on the right of the PlaceListPanel
*All CSS code can be found in LightTheme.css and Extensions.css
3.3. Logic Component

API :
Logic.java
Below is an overview of the Logic interface:
-
Logicuses theTravelBuddyParserclass to parse the user command. -
This results in a
Commandobject which is executed by theLogicManager. -
The command execution can affect the
Model(e.g. adding a place). -
The result of the command execution is encapsulated as a
CommandResultobject which is passed back to theUi. -
In addition, the
CommandResultobject can also instruct theUito perform certain actions, such as displaying help to the user.
Given in Figure 3.3.2 below is the sequence diagram for interactions within the Logic component for the execute("delete 1") API call.
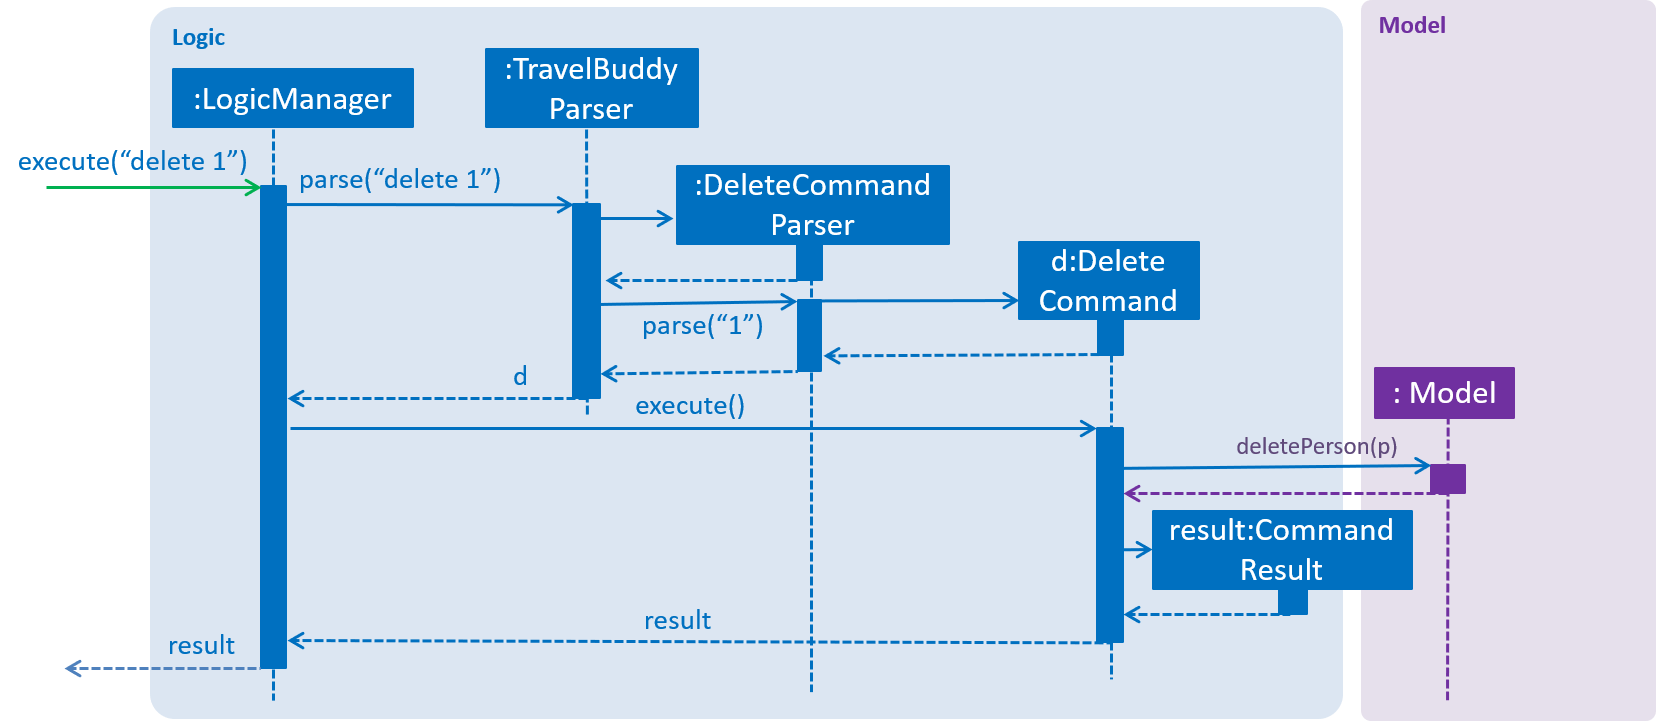
delete 1 command3.4. Model Component

API : Model.java
Below is an overview of the Model interface:
-
Modelstores aUserPrefobject that represents the user’s preferences. -
Modelstores the place data. -
Modelexposes an unmodifiableObservableList<Place>that can be 'observed' e.g. the UI can be bound to this list so that the UI automatically updates when the data in the list change. -
Modeldoes not depend on any of the other three components.
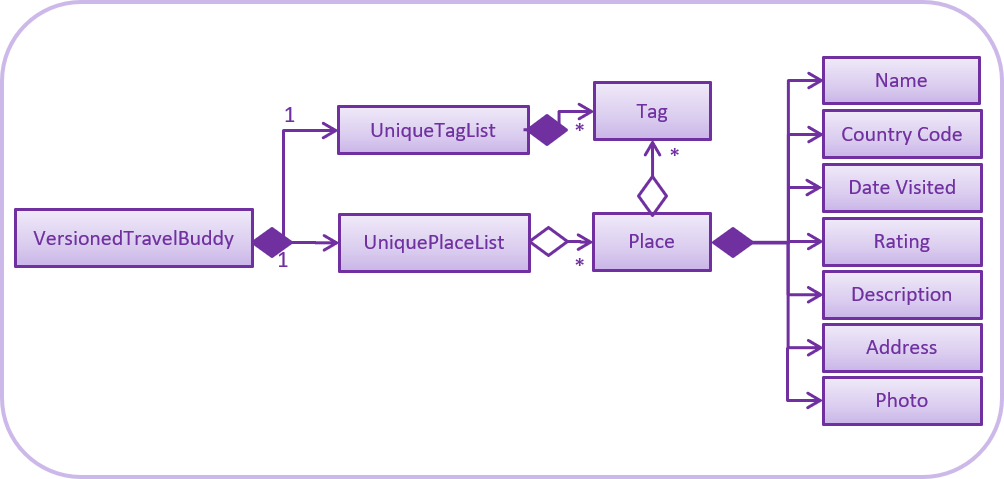
As a more Object Oriented Programming (OOP) model, we can store a Tag list in TravelBuddy, which Place can reference. This would allow TravelBuddy to only require one Tag object per unique Tag, instead of each Place needing their own Tag object. An
example of how such a model may look like is seen in Figure 3.4.2. |
3.5. Storage Component

API : Storage.java
Below is an overview of the Storage interface:
-
Storagecan saveUserPrefobjects in json format and read it back. -
Storagecan save the TravelBuddy data in json format and read it back.
3.6. Common Classes
Classes used by multiple components are in the seedu.travel.commons package.
4. Implementation
This section describes some noteworthy details on how certain features are implemented.
4.1. Undo/Redo Feature
Called by the undo and redo commands to undo and redo changes to TravelBuddy Place entries.
Undoable commands include add, edit, delete, deletem, clear, generate and redo. Redoable commands include add, edit, delete, deletem, clear, generate and undo.
4.1.1. Current Implementation
The undo/redo mechanism is facilitated by VersionedTravelBuddy.
It extends TravelBuddy with an undo/redo history, stored internally as a travelBuddyStateList and currentStatePointer.
Additionally, it implements the following operations:
-
VersionedTravelBuddy#commit()— Saves the current TravelBuddy state in its history. -
VersionedTravelBuddy#undo()— Restores the previous TravelBuddy state from its history. -
VersionedTravelBuddy#redo()— Restores a previously undone TravelBuddy state from its history.
These operations are exposed in the Model interface as Model#commitTravelBuddy(), Model#undoTravelBuddy() and Model#redoTravelBuddy() respectively.
Given below is an example usage scenario and how the undo/redo mechanism behaves at each step.
Step 1. The user launches the application for the first time. The VersionedTravelBuddy will be initialized with the initial TravelBuddy state, and the currentStatePointer pointing to that single TravelBuddy state.

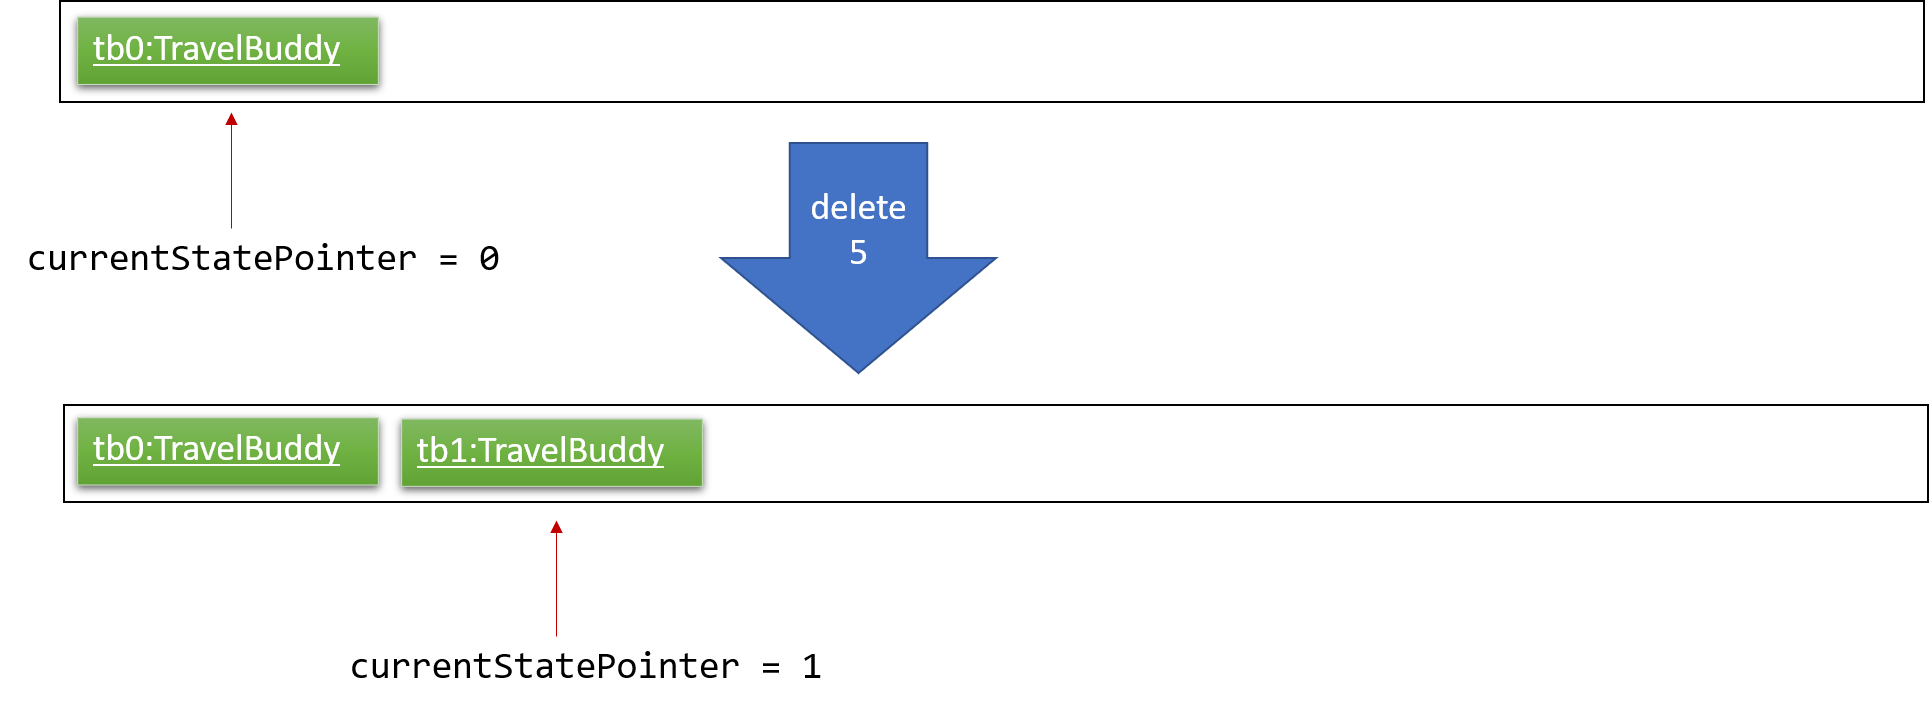
Step 2. The user executes delete 5 command to delete the 5th place in TravelBuddy. The delete command calls
Model#commitTravelBuddy(), causing the modified state of TravelBuddy after the delete 5 command executes to be saved in the travelBuddyStateList, and the currentStatePointer is shifted to the newly inserted TravelBuddy state.
Step 3. The user executes add n/David … to add a new place. The add command also calls Model#commitTravelBuddy(), causing another modified TravelBuddy state to be saved into the travelBuddyStateList.
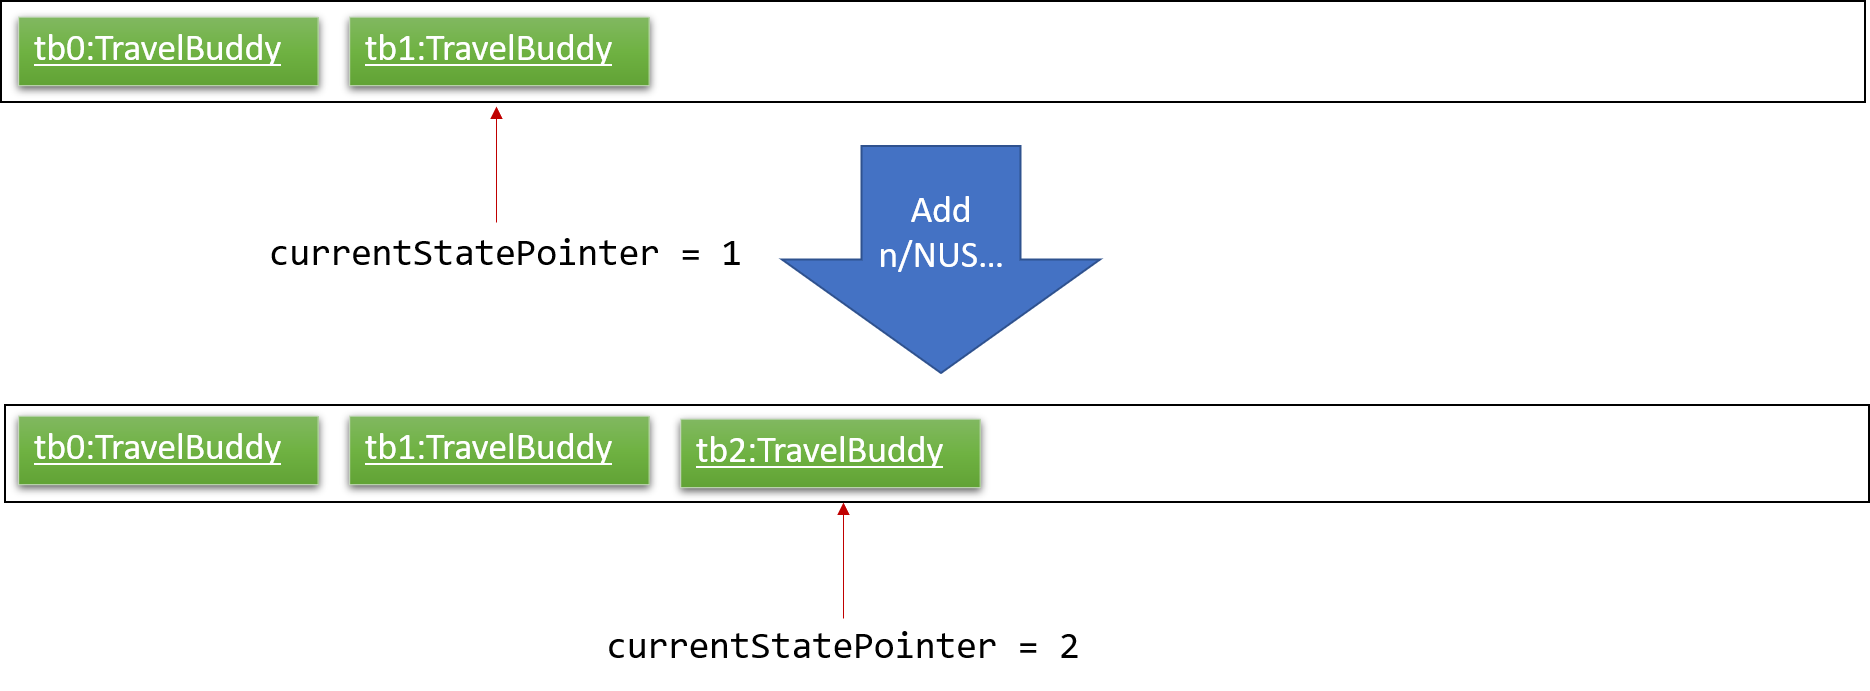
If a command fails its execution, it will not call Model#commitTravelBuddy(), so the TravelBuddy state will not be saved into the travelBuddyStateList.
|
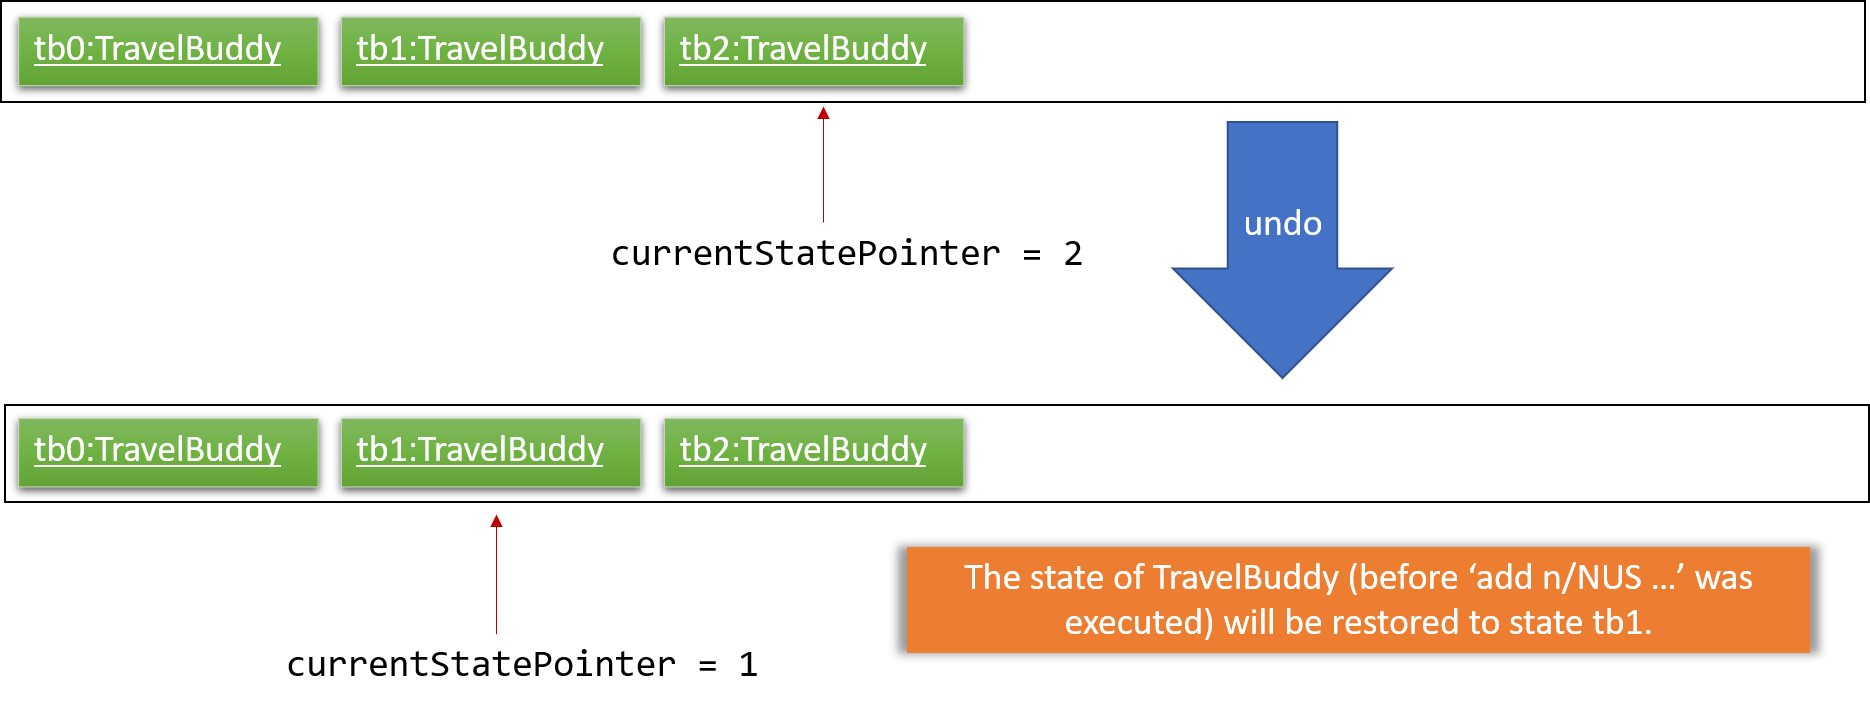
Step 4. The user now decides that adding the place was a mistake, and decides to undo that action by executing the
undo command. The undo command will call Model#undoTravelBuddy(), which will shift the currentStatePointer once to the left, pointing it to the previous TravelBuddy state. This restores the TravelBuddy to that state.
If the currentStatePointer is at index 0, pointing to the initial TravelBuddy state, then there are no previous TravelBuddy states to restore. The undo command uses Model#canUndoTravelBuddy() to check if this is the case. If so, it will return an error to the user rather than attempting to perform the undo.
|
The following sequence diagram shows how the undo operation works:
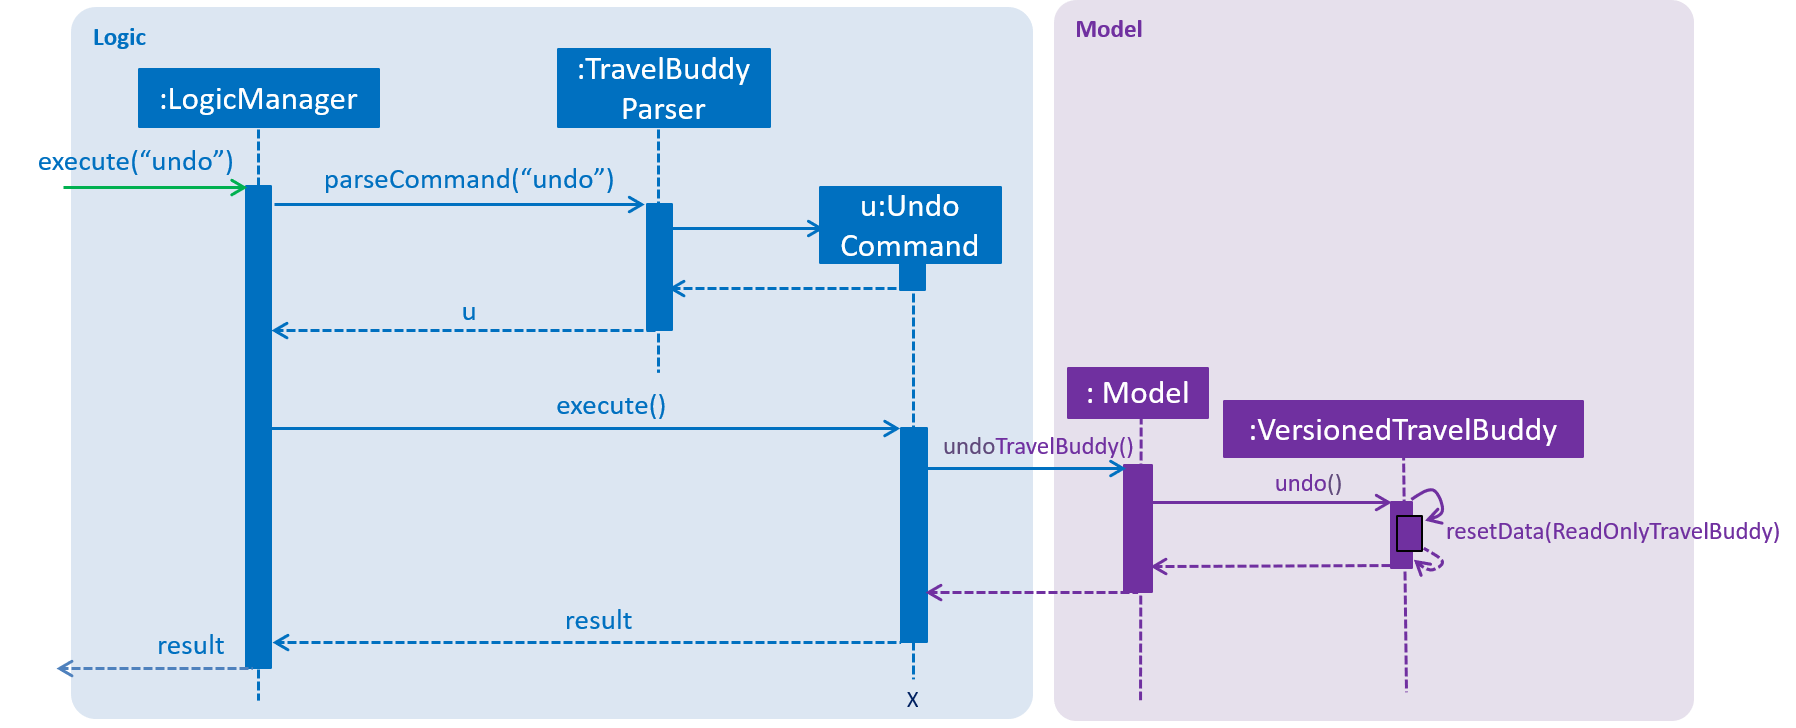
The redo command does the opposite — it calls Model#redoTravelBuddy(), which shifts the currentStatePointer once to the right, pointing to the previously undone state, and restores TravelBuddy to that state.
If the currentStatePointer is at index travelBuddyStateList.size() - 1, pointing to the latest TravelBuddy state, then there are no undone TravelBuddy states to restore. The redo command uses Model#canRedoTravelBuddy() to check if this is the case. If so, it will return an error to the user rather than attempting to perform the redo.
|
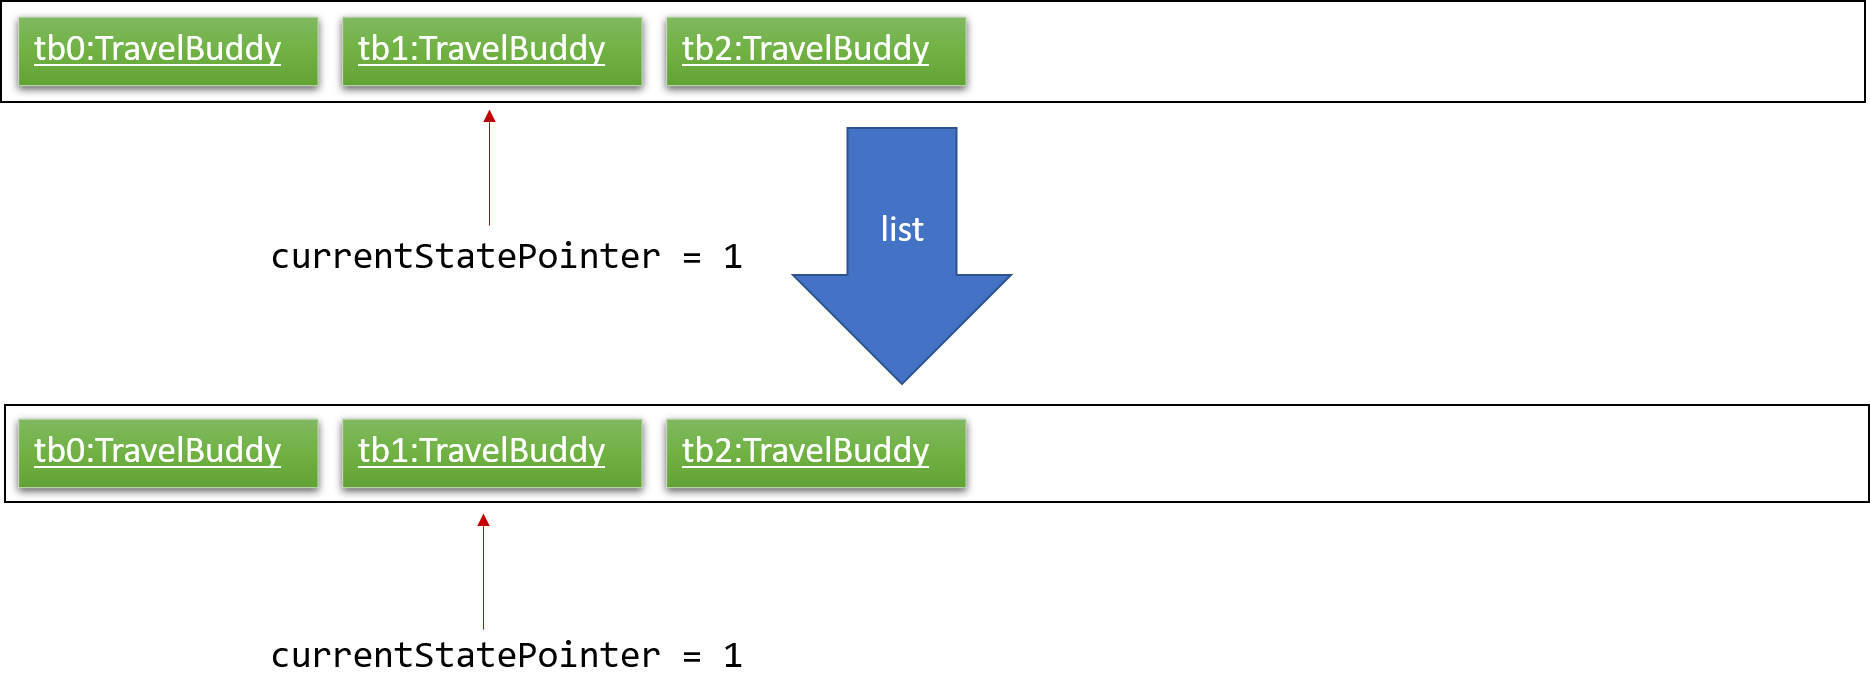
Step 5. The user then decides to execute the command list. Commands that do not modify TravelBuddy, such as list, will usually not call Model#commitTravelBuddy(), Model#undoTravelBuddy() or Model#redoTravelBuddy(). Thus, the travelBuddyStateList remains unchanged.
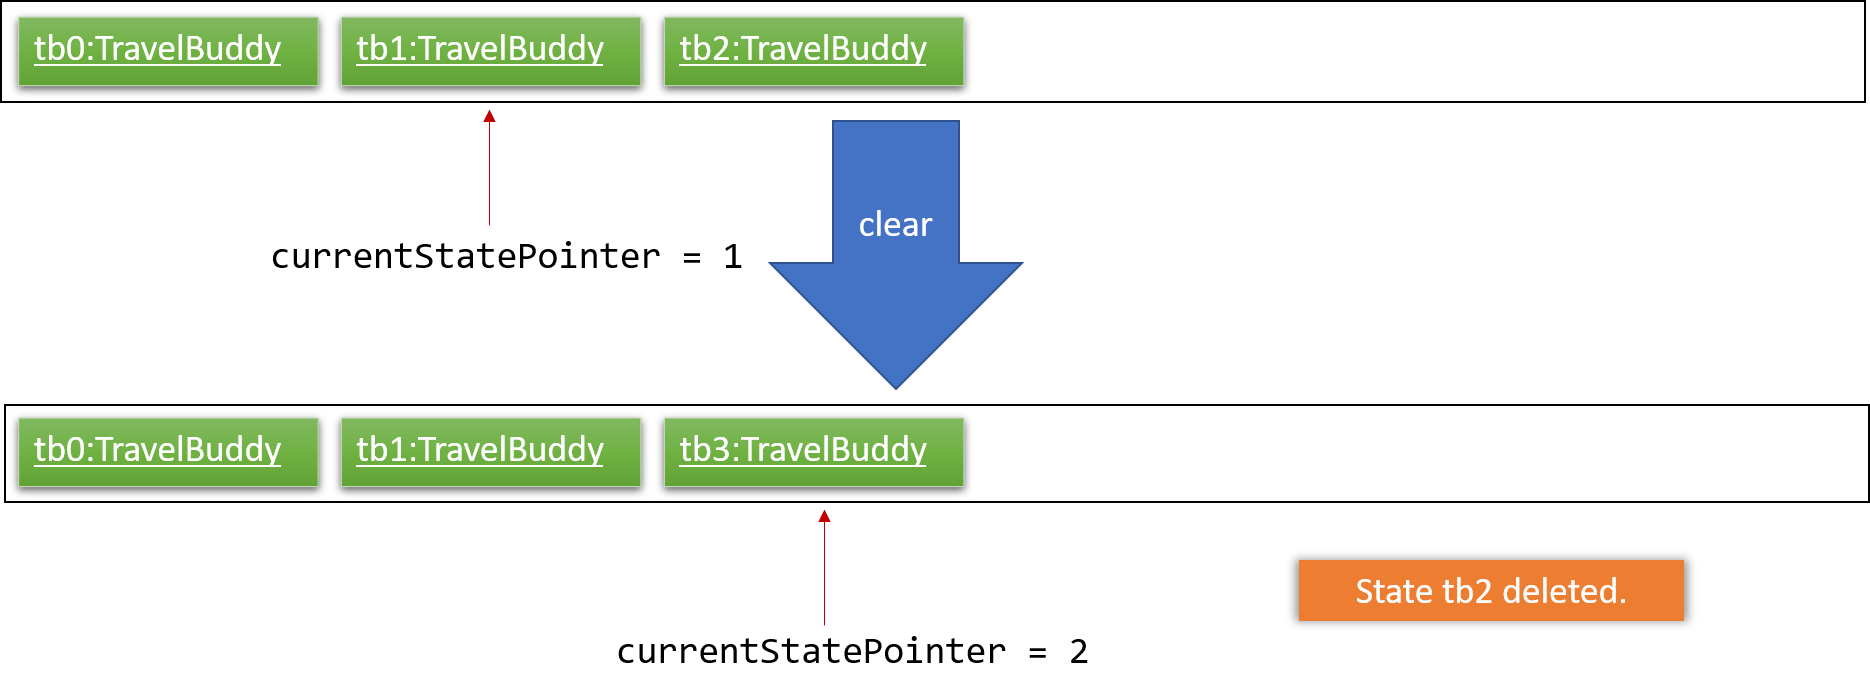
Step 6. The user executes clear, which calls Model#commitTravelBuddy(). Since the currentStatePointer is not pointing at the end of the travelBuddyStateList, all TravelBuddy states after the currentStatePointer will be purged. We designed it this way because it no longer makes sense to redo the add n/David … command. This is the behavior that most modern desktop applications follow.
The following activity diagram summarizes what happens when a user executes a new command:

4.1.2. Design Considerations
Aspect: How undo & redo executes
-
Alternative 1 (current choice): Saves the entire TravelBuddy.
-
Pros: Easy to implement.
-
Cons: May have performance issues in terms of memory usage.
-
-
Alternative 2: Individual command knows how to undo/redo by itself.
-
Pros: Will use less memory (e.g. for
delete, just save the place being deleted). -
Cons: We must ensure that the implementation of each individual command are correct.
-
Aspect: Data structure to support the undo/redo commands
-
Alternative 1 (current choice): Use a list to store the history of TravelBuddy states.
-
Pros: Easy for new Computer Science student undergraduates to understand, who are likely to be the new incoming developers of our project.
-
Cons: Logic is duplicated twice. For example, when a new command is executed, we must remember to update both
HistoryManagerandVersionedTravelBuddy.
-
-
Alternative 2: Use
HistoryManagerfor undo/redo-
Pros: We do not need to maintain a separate list, and just reuse what is already in the codebase.
-
Cons: Requires dealing with commands that have already been undone: We must remember to skip these commands. Violates Single Responsibility Principle and Separation of Concerns as
HistoryManagernow needs to do two different things.
-
4.2. Search Feature
4.2.1. Current Implementation
The search command provides functionality for users to search for places in TravelBuddy that contain the specified input.
The user’s input is split into separate keywords and matched by a Predicate to the list of places in TravelBuddy.
Places with matching keywords will be displayed on the GUI, which allows users to retrieve a list of places according to their input.
Logic: The search mechanism is executed by SearchCommand, which extends from Command. A code snippet is shown below:
public CommandResult execute(Model model, CommandHistory history) {
    requireNonNull(model);
    model.updateFilteredPlaceList(predicate);
    return new CommandResult(constructFeedbackToUser(model));
}
Figure 4.2.1.1 below shows the class diagram of the search mechanism and its associations to the other classes in the Logic component.
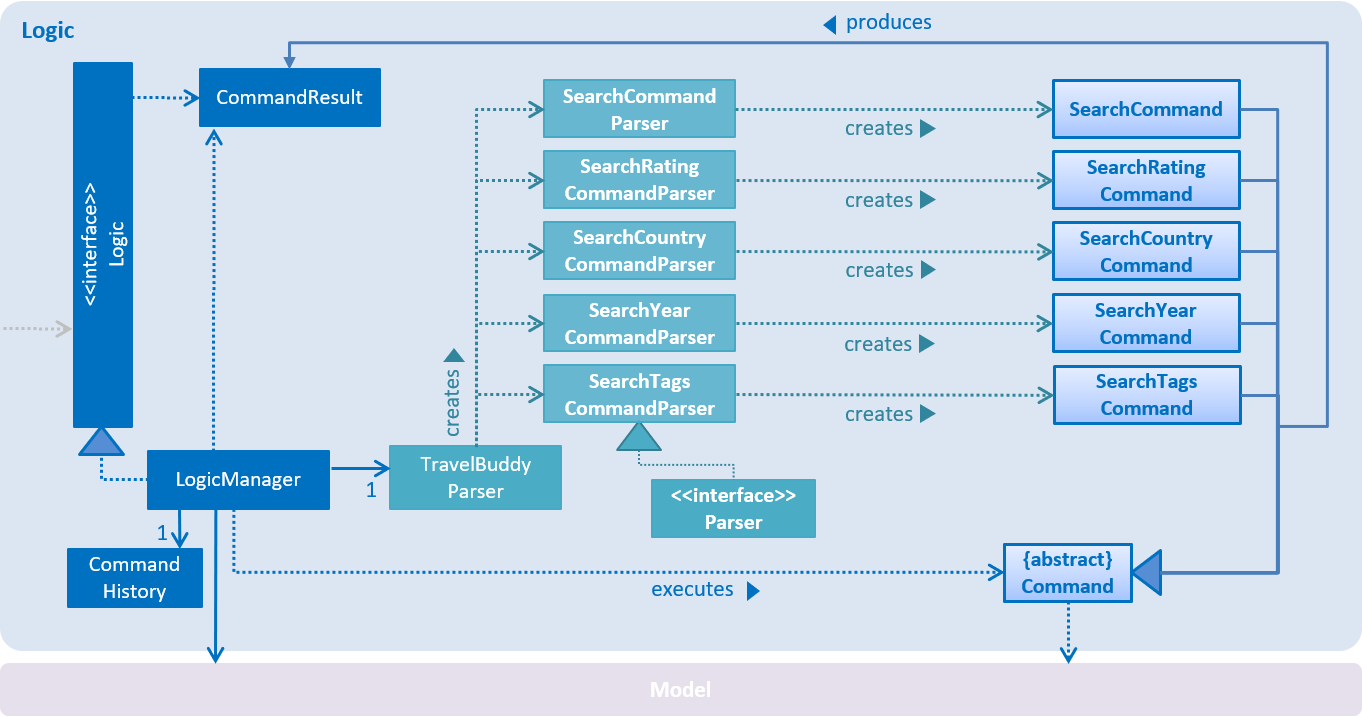
search command.The example below is a usage scenario for the search feature and is based on the search name feature.
The various search features (i.e. search name, country code, rating, tags, year) function on a similar concept, differing only in the Parser which is called using different command words and the Predicate to filter arguments.
|
The following sequence diagram, Figure 4.2.1.2, shows how the search feature works:

search command.The control flow of the sequence diagram above is as follows:
-
Initially, a user enters a command with the command word
searchfollowed by argument(s). -
LogicManagerreceives theexecutecommand and calls theparseCommandmethod inTravelBuddyParser. -
TravelBuddyParserparsessearchas the command and aSearchCommandParserwill be instantiated to further parse the command. -
SearchCommandParserreceives the arguments if the command word input matches the command word of any search command.-
The argument string is split into an array of keywords based on the
regexwhich is\\s+in the code snippet below.String[] nameKeywords = trimmedArgs.split("\\s+"); return new SearchCommand(new NameContainsKeywordsPredicate(Arrays.asList(nameKeywords))); -
A
NameContainsKeywordPredicatewill be instantiated with the array of arguments as the predicate, which will be used to check if any of the places in TravelBuddy matches the user’s input.public boolean test(Place place) { return keywords.stream().anyMatch( keyword -> StringUtil.containsWordIgnoreCase( place.getName().fullName, keyword)); }
-
-
Subsequently,
SearchCommandParsercreates aSearchCommandobject with the predicate and returns it toLogicManager. -
Following that,
LogicManagercalls theexecutemethod ofSearchCommand, shown in the code snippet below.public CommandResult execute(Model model, CommandHistory history) { requireNonNull(model); model.updateFilteredPlaceList(predicate); return new CommandResult(constructFeedbackToUser(model)); } -
SearchCommandupdates the list inModel, which will be displayed in the GUI. -
SearchCommandinstantiates aCommandResultobject and passes it toLogicManager.
The search feature comprises of the following search commands:
-
Search by Name:
search -
Search by Rating:
searchr -
Search by Tags:
searcht -
Search by Country:
searchc -
Search by Year:
searchyear
The various search commands are in lower-case. Mixed-case or upper-case commands are not recognised by the application.
|
Search Name Feature
The command word for search name is search and is parsed by TravelBuddyParser. The arguments are then passed into SearchCommandParser.
The name arguments entered by the user are stored in a list of keywords and passed into NameContainsKeywordsPredicate, where the list is converted into a stream and individually matched to the names of each entry in TravelBuddy.
The search name mechanism is facilitated by SearchCommand, which extends Command with a predicate that specifies the conditions of the name of the place to be chosen from TravelBuddy.
Given below is an example usage scenario and how the search mechanism behaves at each step.
Step 1. The user launches the application and sees the GUI with the user’s list of places as shown in Figure 4.2.1.3 below.
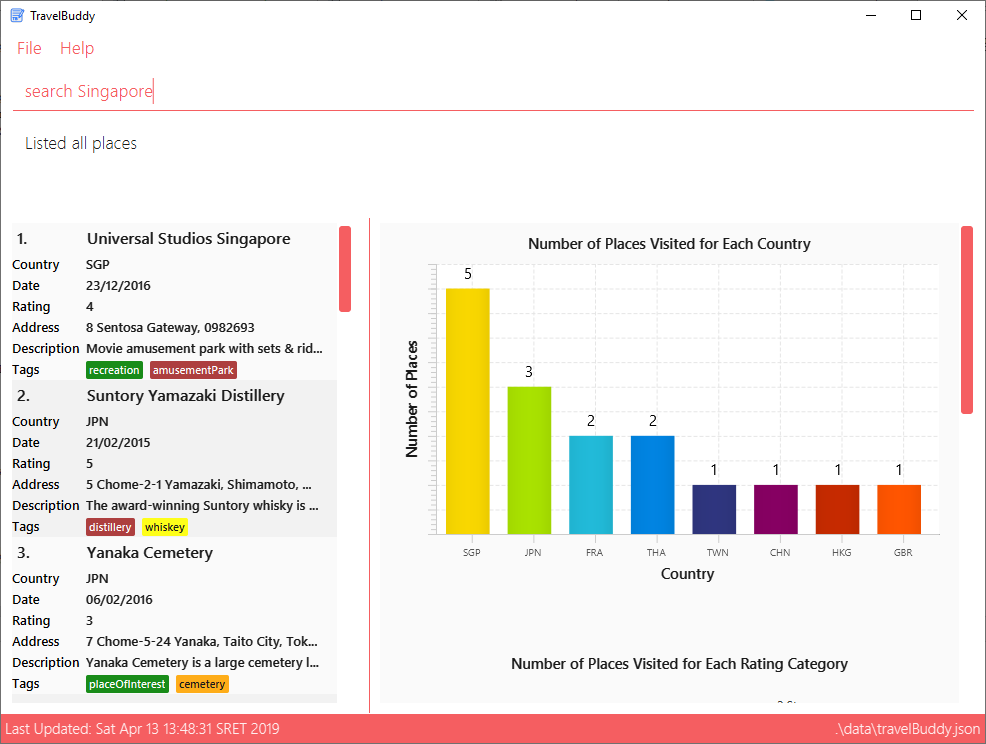
search Singapore command.Step 2. The user executes search Singapore command to search for all entries in TravelBuddy with Singapore in its name.
The user input will be passed into LogicManager#execute(), which in turn uses TravelBuddyParser#parseCommand(). Since the command is search, SearchCommandParser#parse(arguments) will be called to parse the arguments to be used in SearchCommand.
The parsed arguments will be compared to every entry in TravelBuddy and matching entries will be displayed.
Step 3. The filtered list is now displayed according to the requirements set by the user input as shown in Figure 4.2.1.4 below.
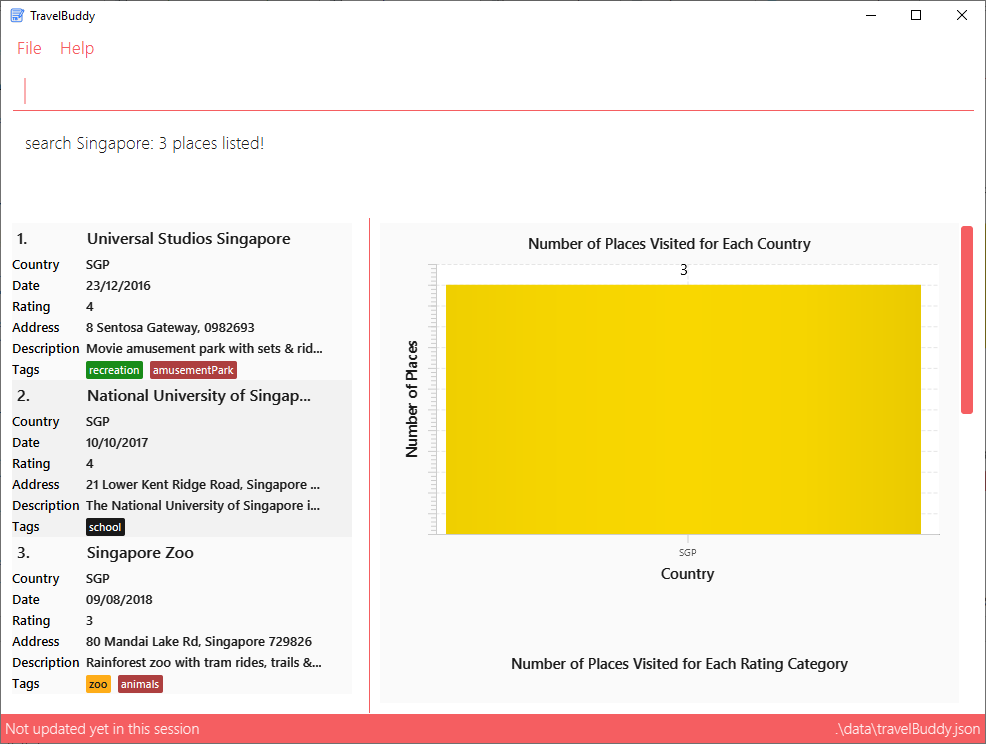
search Singapore command.Search Rating Feature
The command word for search rating is searchr and is parsed by TravelBuddyParser. The arguments are then passed into SearchRatingCommandParser.
The rating arguments entered by the user are first checked for validity before being stored in a list of keywords and passed into RatingContainsKeywordsPredicate. The list is then converted into a stream and individually matched to the rating of each entry in TravelBuddy.
The search rating mechanism is facilitated by SearchRatingCommand, which extends Command with a predicate that specifies the conditions of the rating of the place to be chosen from TravelBuddy.
Given below is an example usage scenario and how the search rating mechanism behaves at each step.
Step 1. The user launches the application and sees the GUI with the user’s list of places as shown in Figure 4.2.1.5 below.
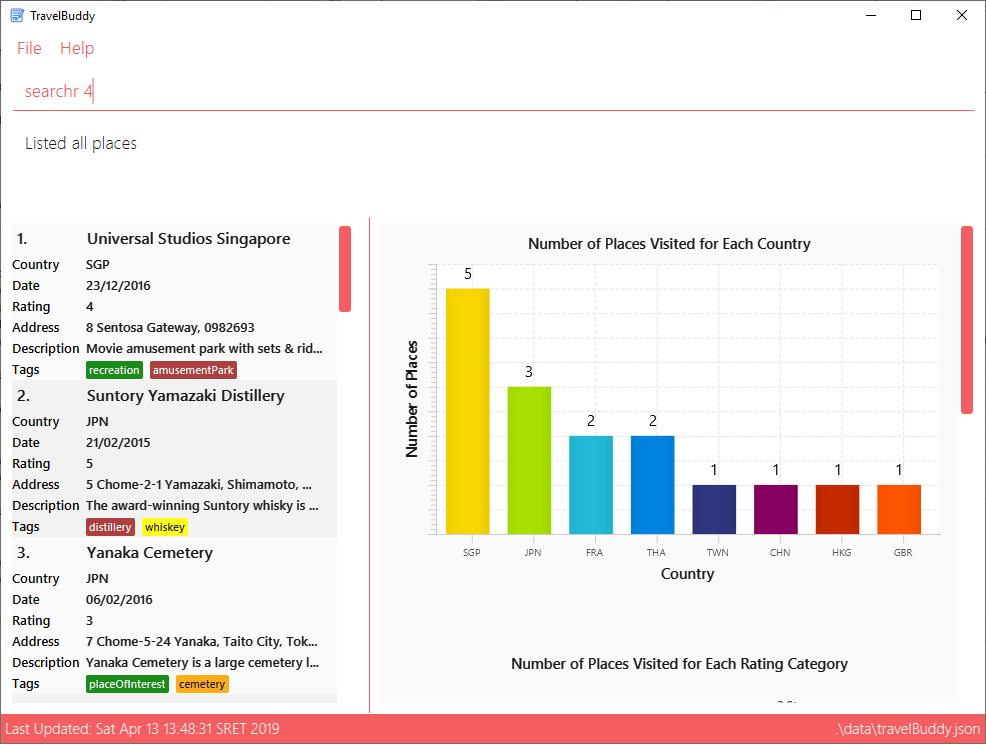
searchr 4 command.Step 2. The user executes searchr 4 command to search for all entries in TravelBuddy with 4 as its rating.
The user input will be passed into LogicManager#execute(), which in turn uses TravelBuddyParser#parseCommand(). Since
the command is searchr, SearchRatingCommandParser#parse(arguments) will be called to parse the arguments to be
used in SearchRatingCommand. The arguments are checked for validity (i.e. rating value between 1 to 5) as seen in the code snippet below before being parsed.
String[] ratingKeywords = trimmedArgs.split("\\s+");
for (String rating : ratingKeywords) {
    if (!Rating.isValidRating(rating)) {
        throw new ParseException(String.format(Rating.MESSAGE_CONSTRAINTS,
             SearchRatingCommand.MESSAGE_USAGE));
    }
}
return new SearchRatingCommand(new RatingContainsKeywordsPredicate(Arrays.asList(ratingKeywords)));
The parsed arguments will be compared to every entry in TravelBuddy and matching entries will be displayed.
The arguments for searchr range from 1 to 5. Non-integer values outside the range are not recognised by the application.
|
Step 3. The filtered list is now displayed according to the requirements set by the user input as shown in Figure 4.2.1.6 below.
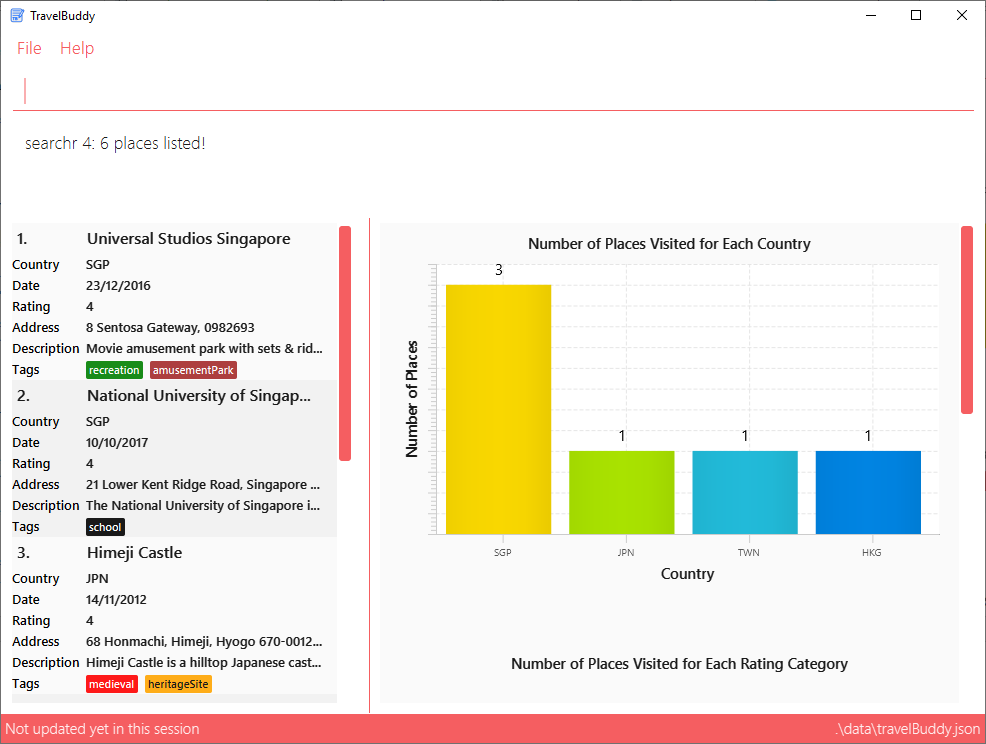
searchr 4 command.Search Tags Feature
The command word for search tags is searcht and is parsed by TravelBuddyParser. The arguments are then passed into SearchTagsCommandParser.
The tags arguments entered by the user are stored in a list of keywords and passed into TagsContainsKeywordsPredicate, where the list is converted into a stream and individually matched to the tags of each entry in TravelBuddy.
The search tags mechanism is facilitated by SearchTagsCommand, which extends Command with a predicate that specifies the conditions of the tags of the place to be chosen from TravelBuddy.
Given below is an example usage scenario and how the search tags mechanism behaves at each step.
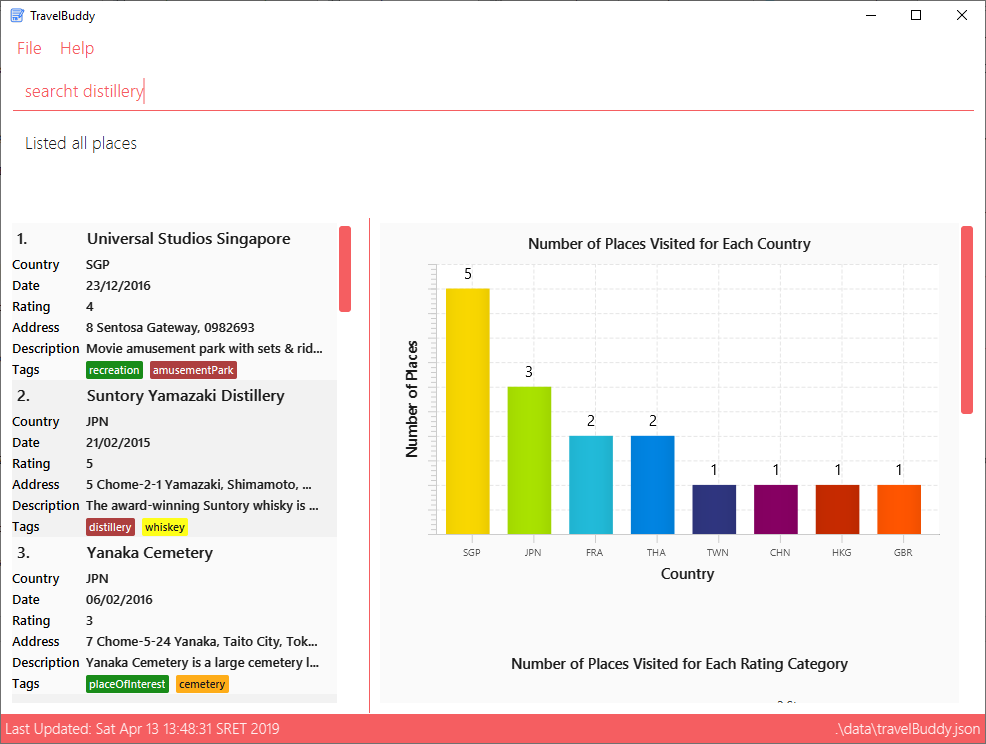
Step 1. The user launches the application and sees the GUI with the user’s list of places as shown in Figure 4.2.1.7 below.
Step 2. The user executes searcht distillery command to search for all entries in TravelBuddy with distillery
as its tag. The user input will be passed into LogicManager#execute(), which in turn uses
TravelBuddyParser#parseCommand(). Since the command is searcht, SearchTagsCommandParser#parse(arguments)
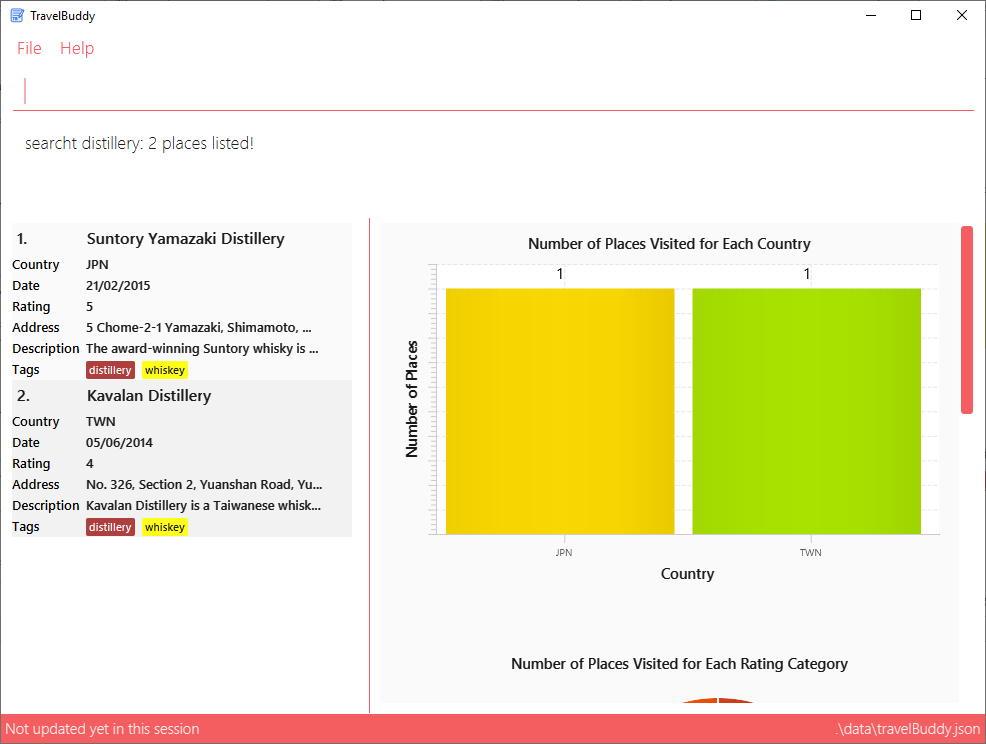
will be called to parse the arguments to be used in SearchTagsCommand. The parsed arguments will be compared to every entry in TravelBuddy and matching entries will be displayed.
Step 3. The filtered list is now displayed according to the requirements set by the user input as shown in Figure 4.2.1.8 below.
Search Country Feature
The command word for search country is searchc and is parsed by TravelBuddyParser. The arguments are then passed into SearchCountryCommandParser.
The country code arguments entered by the user are stored in a list of keywords and passed into CountryCodeContainsKeywordsPredicate, where the list is converted into a stream and individually matched to the country code of each entry in TravelBuddy.
The search country mechanism is facilitated by SearchCountryCommand, which extends Command with a predicate that specifies the conditions of the country code of the place to be chosen from TravelBuddy.
Given below is an example usage scenario and how the search country mechanism behaves at each step.
Step 1. The user launches the application and sees the GUI with the user’s list of places as shown in Figure 4.2.1.9 below.
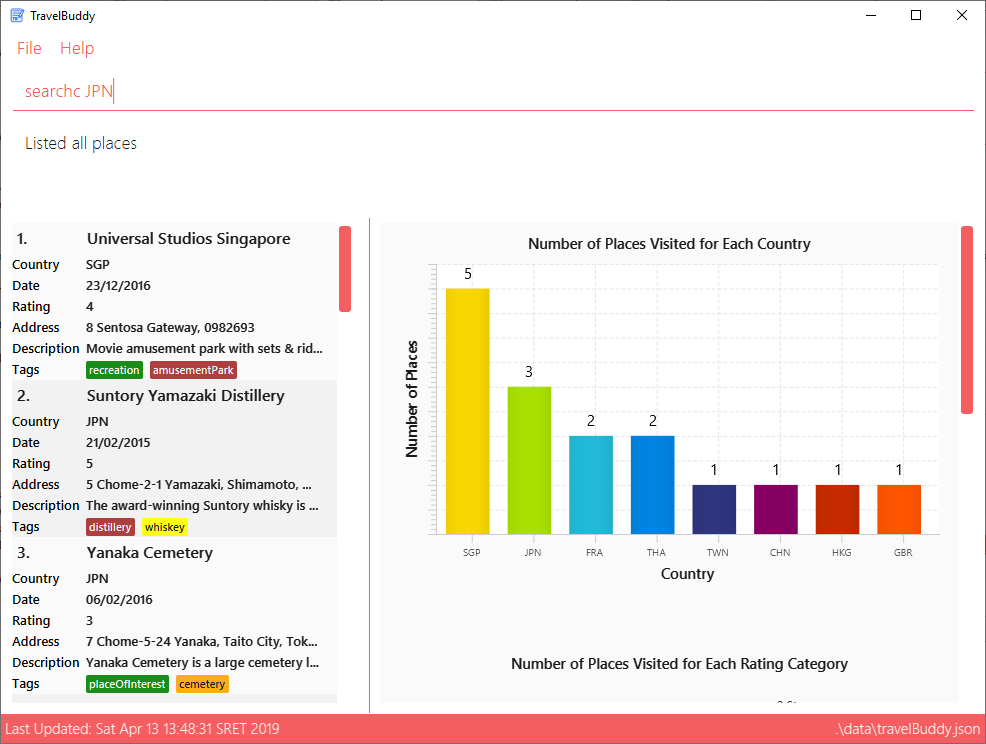
searchc JPN command.Step 2. The user executes searchc SGP JPN command to search for all entries in TravelBuddy with SGP or JPN
as its country. The searchc command will call LogicManager#execute(), which in turn uses
TravelBuddyParser#parseCommand(). Since the command is searchc, SearchCountryCommandParser#parse(arguments)
will be called to parse the arguments to be used in SearchCountryCommand. The arguments are then checked for validity (i.e. valid ISO-3166 country code).
The parsed arguments will be compared to every entry in TravelBuddy and matching entries will be displayed.
The country code arguments for searchc must be valid three-letter ISO-3166 country codes.
|
Step 3. The filtered list is now displayed according to the requirements set by the user input as shown in Figure 4.2.1.10 below.
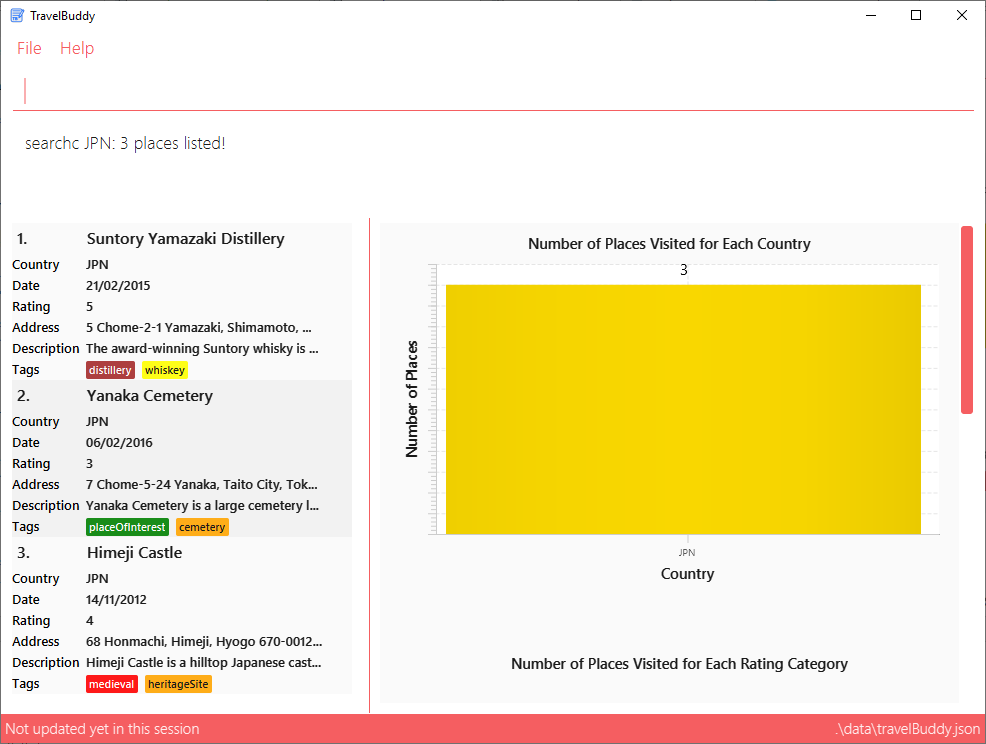
searchc JPN command.Search Year Feature
The command word for search year is searchyear and is parsed by TravelBuddyParser. The arguments are then passed into SearchYearCommandParser.
The year arguments entered by the user are stored in a list of keywords and passed into YearContainsKeywordsPredicate, where the list is converted into a stream and individually matched to the year of visit of each entry in TravelBuddy.
The search year mechanism is facilitated by SearchYearCommand, which extends Command with a predicate that specifies the conditions of the year of visit of the place to be chosen from TravelBuddy.
Given below is an example usage scenario and how the search year mechanism behaves at each step.
Step 1. The user launches the application and sees the GUI with the user’s list of places as shown in Figure 4.2.1.11 below.
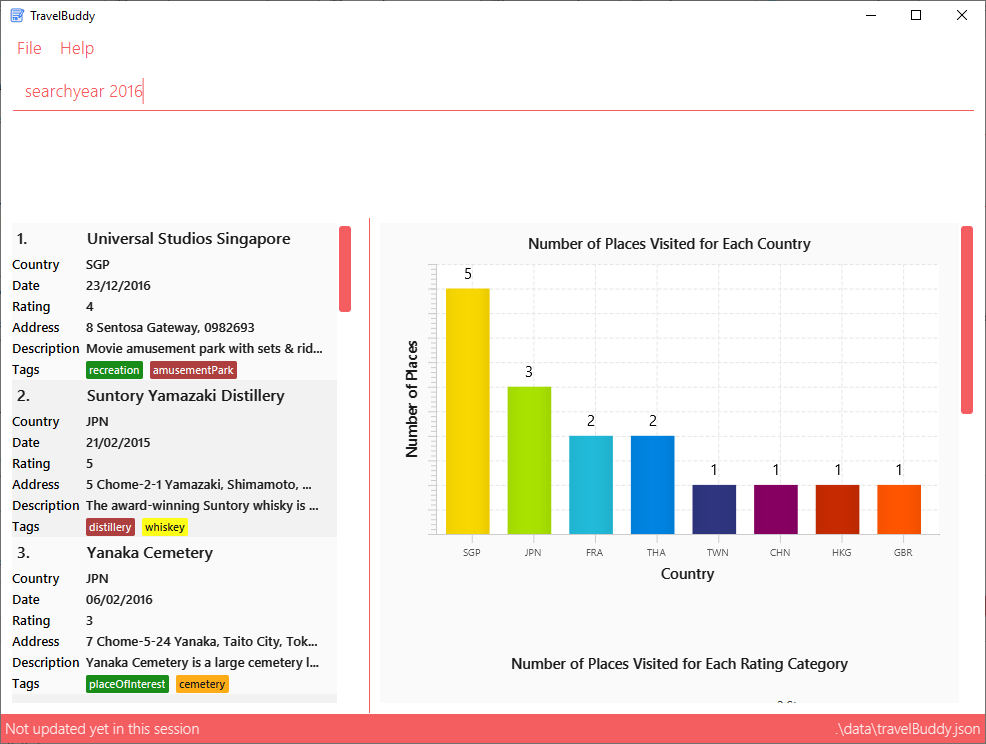
searchyear 2016 command.Step 2. The user executes searchyear 2016 command to search for all entries in TravelBuddy with 2016
as its year visited. The searchyear command will call LogicManager#execute(), which in turn uses
TravelBuddyParser#parseCommand(). Since the command is searchyear, SearchYearCommandParser#parse(arguments)
will be called to parse the arguments to be used in SearchYearCommand. The arguments are then checked for validity (i.e. valid year from 1900 to the current year).
The parsed arguments will be compared to every entry in TravelBuddy and matching entries will be displayed.
| The year arguments range from 1900 to the current year. A single year, multiple years or a range of years can be passed in as arguments. |
Step 3. The filtered list is now displayed according to the requirements set by the user input as shown in Figure 4.2.1.12 below.
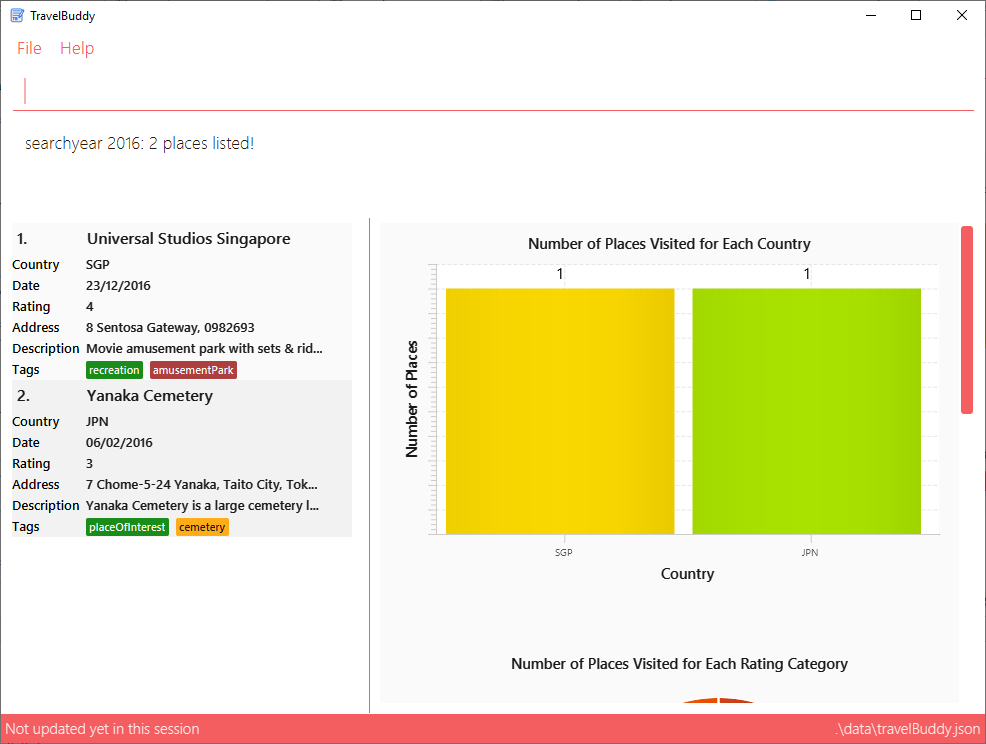
searchyear 2016 command.The activity diagram, Figure 4.2.1.13, below summarises what happens when a user inputs a search command:

4.2.2. Design Considerations
Aspect: Designing how search executes
Given below is a comparison between the alternatives of the search mechanism design.
| Alternative 1 (current choice) | Alternative 2 | |
|---|---|---|
Description |
Matches entire keyword. |
Remove whitespaces and check if the place contains the argument string. |
Pros |
Speed: This approach is faster in processing speed and computationally less intensive. |
Flexible: This approach supports a search for partial keywords, so that users do not have to type the full keyword. |
Cons |
Inflexible: This approach is unable to support a search for partial keywords and may prove to be restrictive for certain users. |
Unrefined results: This approach provides a wider range of results, which may devolve into a messy clutter if the keyword is too general, defeating the purpose of filtering the list through search. |
Decision: Alternative 1 of matching the entire keyword is adopted as it reduces processing time during keyword matching.
In addition, it narrows down the search options by only returning keywords that matches the search query, which is the main objective of the search feature.
Aspect: Data structure to support search commands
Given below is a comparison between the alternatives of the data structure used in search.
| Alternative 1 (current choice) | Alternative 2 | |
|---|---|---|
Description |
Use a list to store the user input keywords and places. |
Use |
Pros |
Ease-of-implementation: Easy for new Computer Science student undergraduates to understand, who are likely to be the new incoming developers of our project. |
Faster search: Faster searching as |
Cons |
Slower search: This approach is less efficient as the entire list needs to be searched through. |
Memory-consuming. This approach requires more memory as a separate |
Decision: Alternative 1 of using a list is preferred as it uses less memory compared to Alternative 2. Moreover, future contributors are likely to be student undergraduates, so a simple data structure would be more optimal for educational purposes.
4.3. Add Feature
The add command is used to add a place into TravelBuddy. The user can add the following details related to the
place: name, country code, date visited, rating, address, description, photo (Optional) and
Tag (Optional).
| The country code adheres to the three-letter ISO-3166 standard. The full list of country codes can be found here. |
4.3.1. Current Implementation
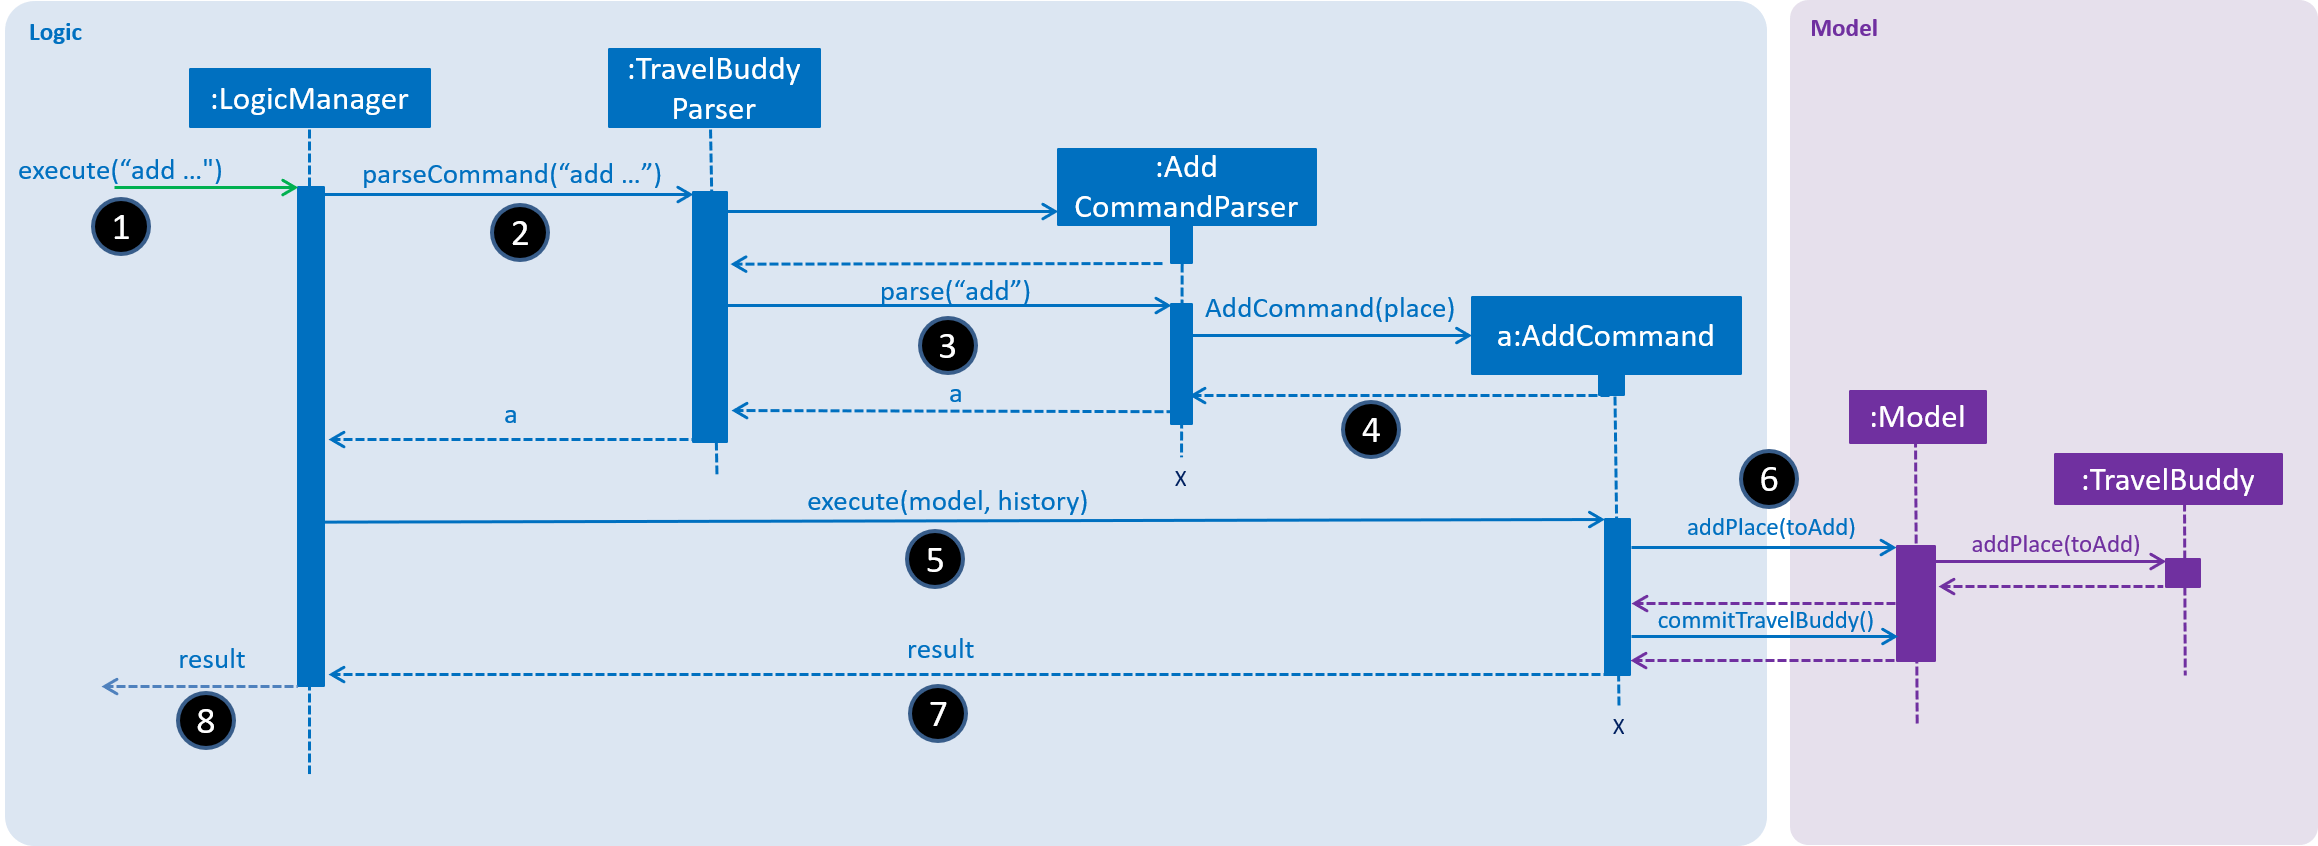
Figure 4.3.1.1 is a sequence of steps that illustrates the interaction between various classes when the add
command is
entered.
add commandadd n/NUS Computing cc/SGP dv/10/10/2017 r/3 d/My School a/13 Computing Drive,
117417 t/faculty
1) The String user input is passed into the LogicManager::execute method of the LogicManager instance as the
only parameter.
2) The LogicManager::execute method calls TravelBuddyParser::parseCommand which receives the user input as a
parameter.
-
The user input is formatted: the first
Stringtoken is taken as the command word and the rest of the String is grouped as arguments to be used later by theAddCommandParser. -
From the command word, the
TravelBuddyParserinstance identifies the user input as anaddcommand and constructs an instance ofAddCommandParser.
3) TravelBuddyParser calls the AddCommandParser::parse method. The AddCommandParser takes in the rest of the
string, which is
n/NUS Computing cc/SGP dv/10/10/2017 r/3 d/My School a/13 Computing Drive, 117417 t/faculty
-
The string is tokenised to arguments based on their prefixes.
ArgumentMultimap argMultimap = ArgumentTokenizer.tokenize(args, PREFIX_NAME,
     PREFIX_COUNTRY_CODE, PREFIX_DATE_VISITED, PREFIX_RATING,
PREFIX_DESCRIPTION, PREFIX_ADDRESS, PREFIX_PHOTO, PREFIX_TAG);-
A check is made on the presence of the relevant prefixes
n/,cc/,dv/,r/,d/,a/,p/andt/. -
When the mandatory prefixes are not present, a
ParseExceptionwill be thrown with an error message on the proper usage of theaddcommand.
 if (!arePrefixesPresent(argMultimap, PREFIX_NAME, PREFIX_COUNTRY_CODE,
     PREFIX_DATE_VISITED, PREFIX_ADDRESS, PREFIX_RATING, PREFIX_DESCRIPTION)
     || !argMultimap.getPreamble().isEmpty()) {
     throw new ParseException(String.format(MESSAGE_INVALID_COMMAND_FORMAT,
         AddCommand.MESSAGE_USAGE));
}-
Otherwise, a
Placeobject is constructed and used as a field in the creation of aAddCommandobject.
4) The newly created AddCommand object is returned to back to the LogicManager instance through the
AddCommandParser and TravelBuddyParser objects.
5) Once the control is returned to the LogicManager object, it calls the AddCommand::execute method.
-
The method takes in a Model object to access the application’s data context, the stored data of all places.
-
The code snippet below shows the
AddCommand::executemethod.
 public CommandResult execute(Model model, CommandHistory history)
     throws CommandException {
     requireNonNull(model);
     if (model.hasPlace(toAdd)) {
         throw new CommandException(MESSAGE_DUPLICATE_PLACE);
     }
     model.addPlace(toAdd);
     model.commitTravelBuddy();
     return new CommandResult(String.format(MESSAGE_SUCCESS, toAdd));
}-
A check is made on whether the place already exists in TravelBuddy. If it already exists, a
CommandExceptionwill be thrown with an error message on the duplicate entry of the place.
6) The Place data is added into TravelBuddy.
-
Here, the
Model::addPlacemethod is called, and it subsequently calls theTravelBuddy::addPlacemethod. -
Following which, the
Model::commitTravelBuddymethod is called.
7) The AddCommand::execute execution completes by returning a new CommandResult that contains a success message to
its calling method which is LogicManager::execute.
8) Finally, the CommandResult is returned to the caller of LogicManager::execute and the execution sequence ends.
Add Command
Given below is an example usage scenario and what the user will see in the GUI.
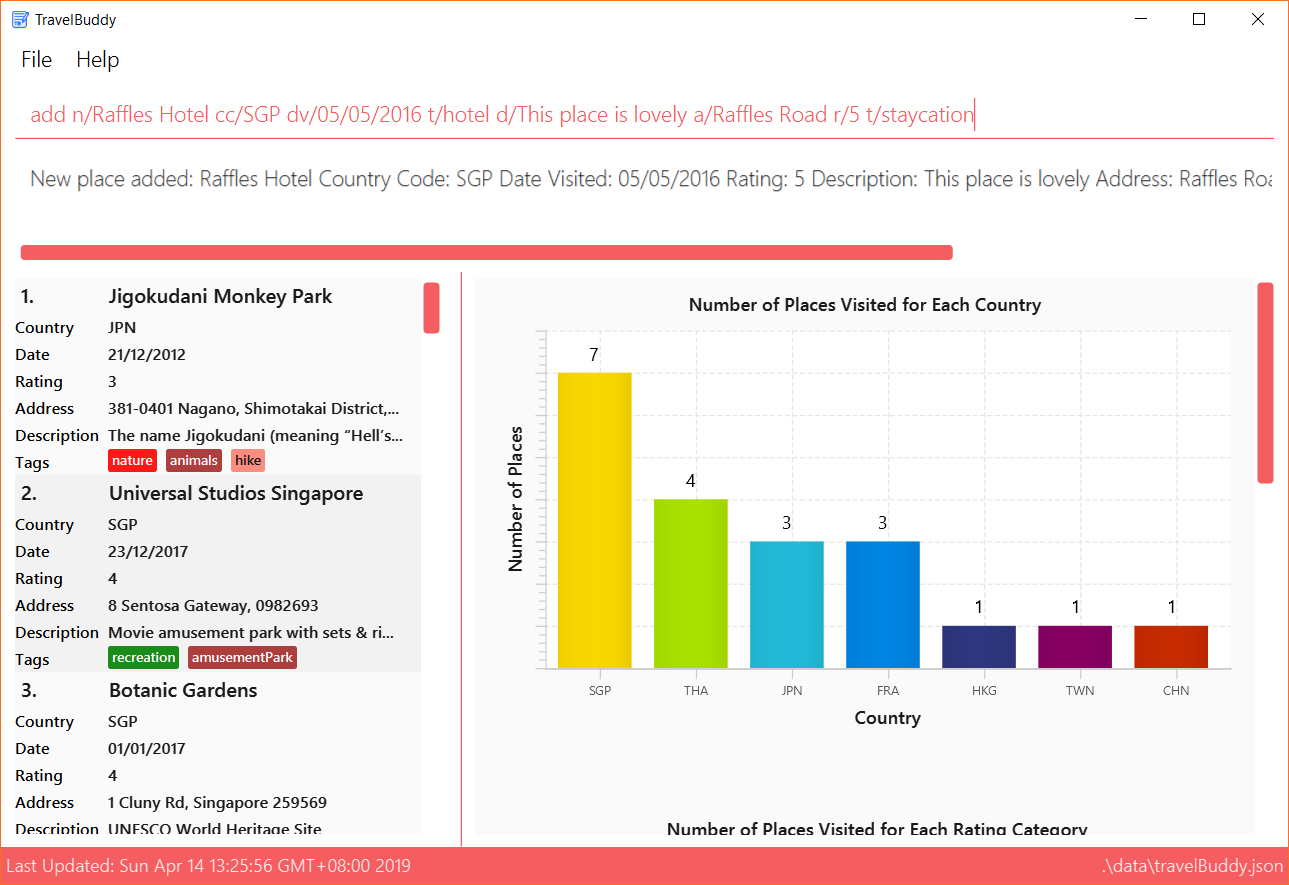
The user launches the application and enters the full add command add n/Raffles Hotel cc/SGP dv/05/05/2016 t/hotel d/This place is lovely a/Raffles Road r/5 t/staycation
117417 t/faculty. TravelBuddy will start executing the steps mentioned in
Figure 4.3.1.1 and the output is shown above in Figure 4.3.1.2.
The command add is in lower-case. Mixed-case or upper-case commands are not recognised by TravelBuddy.
|
4.3.2. Design Considerations
Aspect: Data structure to store country codes
Given below is a comparison between the alternatives for the data structure that can be used for country codes.
| Alternative 1 (current choice) | Alternative 2 | |
|---|---|---|
Description |
Use |
Create a data structure containing only the top 30 commonly traveled countries in the world. |
Pros |
Ease-of-use. This approach simply requires the importing of |
Fast. This approach is computationally less intensive than Alternative 1. This is because there are only 30 country codes in the data structure. |
Cons |
Slightly slow. This approach is computationally more intensive than Alternative 1. This is because there are 250 country codes to search from. |
Tedious. This approach requires the coder to search for the top 30 visited countries in the world and type out all
the 30, 3-letter country codes as specified in ISO-3166. |
Decision: Alternative 1 is used for the current implementation. Alternative 2 may not fulfill all of the user requirements of adding any country code. Alternative 1’s speed is only slightly slower than Alternative 2.
4.4. Photos Feature
The Photo feature gives users the ability to attach an existing image file to any Place object,
which is then displayed in the ExpandedPlacePanel when the select command is called on a particular Place.
4.4.1. Current Implementation
This feature is currently integrated as part of the add and edit commands. It works by accepting the user-entered
absolute file path of the image as an add or edit command parameter, specified by the prefix p/.
Figure 4.4.1.1 below is a sequence of steps, illustrating the interaction between various classes when the add command is used to include a photo with a newly created place.
Step 1: The user enters the command add n/Himeiji Castle cc/JPN dv/15/12/2017 r/5 d/Wow.
a/Kyoto t/castle p/C:\Users\Shaun\Pictures\castle-photo.jpg.
Step 2 - 5: Identical to add command sequence steps 2 - 5, please refer to Section 4.3, “Add Feature” for details
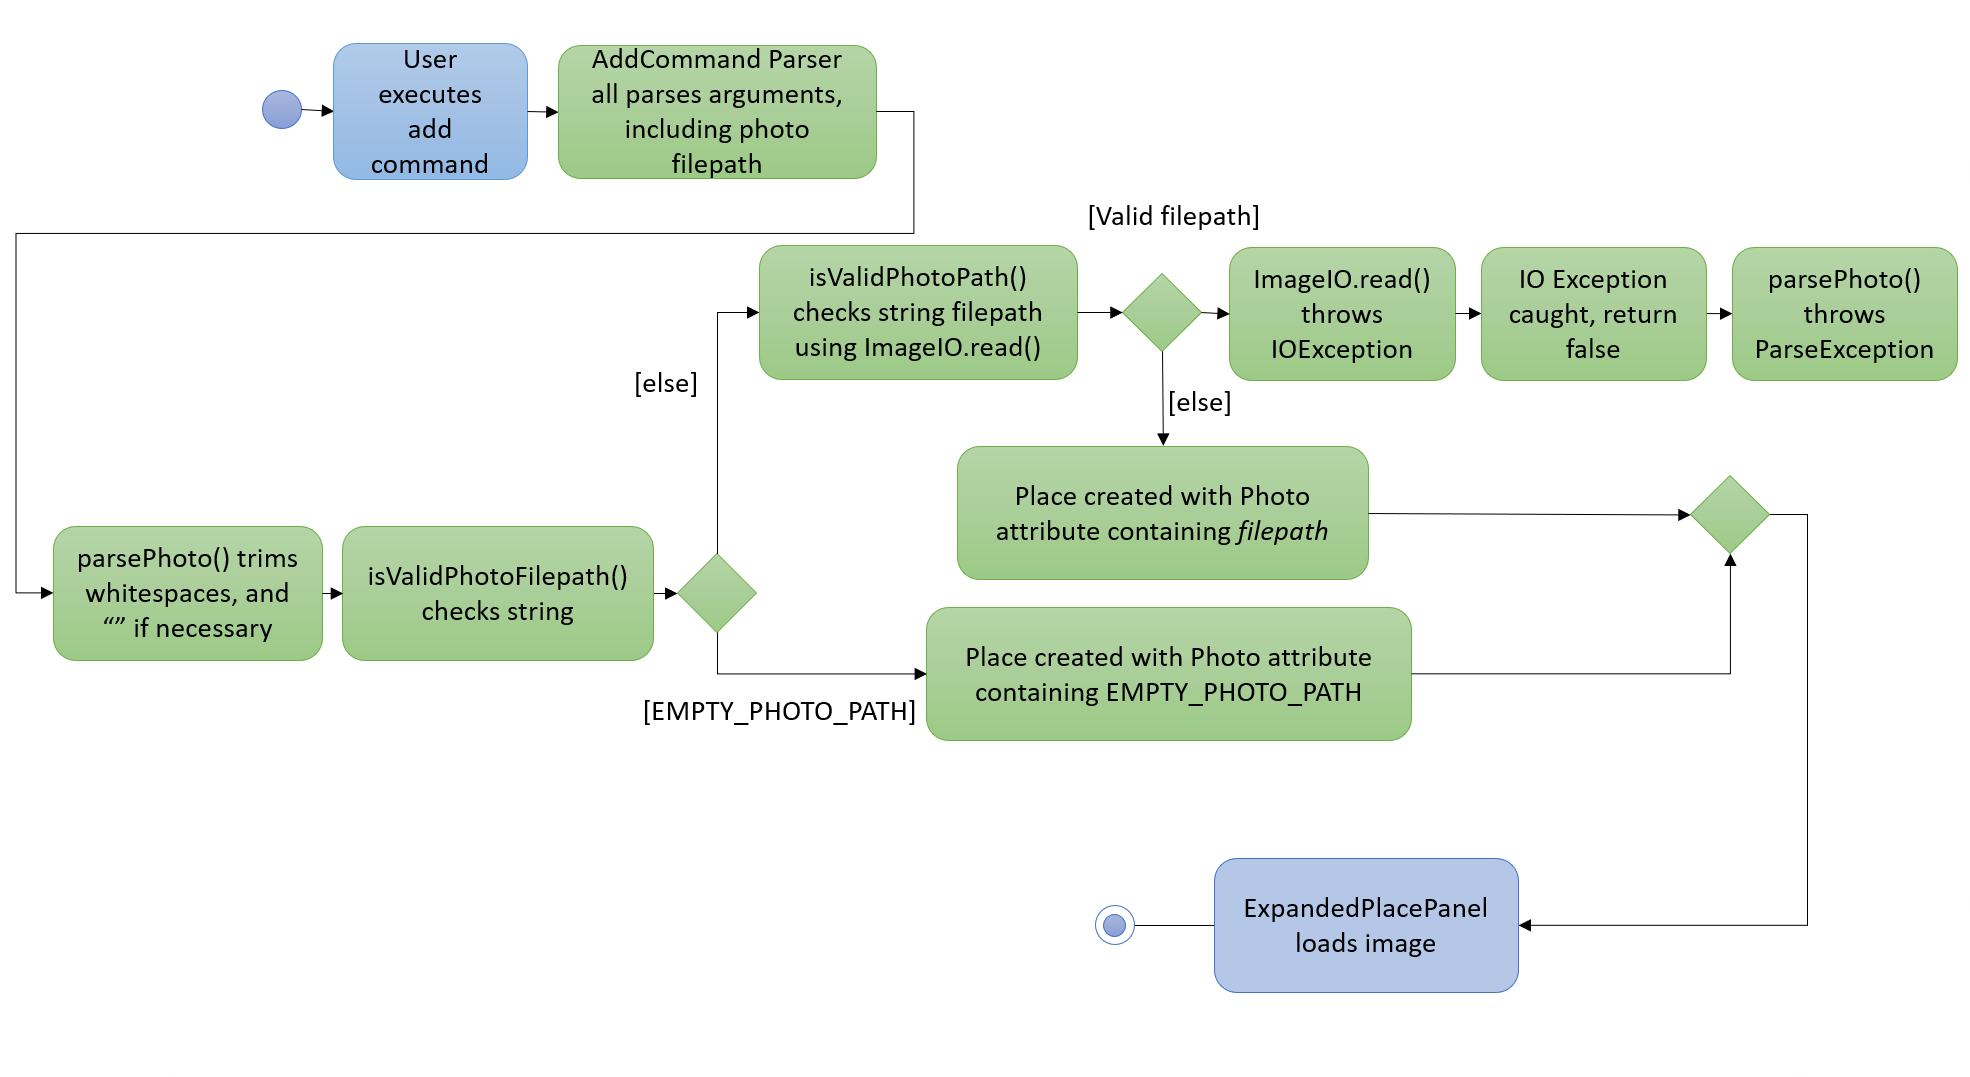
Step 6: The AddCommandParser interprets the arguments, and checks the file path input using ParserUtil.parsePhoto().
Step 7: parsePhoto() then trims any leading whitespaces. It also trims a single leading and trailing double quotation mark ".
This is for ease of use with the Windows 10 File Explorer Copy Path Home menu function, which returns the filepath of the selected file
wrapped with double quotation marks ".
Step 8.1: As the photo parameter is optional for add command, if photo prefix p/ is not used, AddCommandParser
calls the 2nd overloaded Place() constructor to create a Place with a special string EMPTY_PHOTO_PATH in the Photo attribute.
Step 8.2:
-
If photo prefix
p/is used, he validity of the filepath is then checked with thePhoto.isValidPhotoFilepath()method. The method relies on usingImageIO.read()to try opening the file using the providedfilepathstring. If the filepath is invalid or the file cannot be opened, thenImageIO.read()throws aIOException. The exception is caught, control returns toparsePhoto()and aParseException is thrown.
    public static boolean isValidPhotoFilepath(String test) {
        if (!(test instanceof String)) {
            throw new NullPointerException();
        }
        try {
            File testPhoto = new File(test);
            Image image = ImageIO.read(testPhoto);
            FileInputStream testStream = new FileInputStream(testPhoto);
            if (image == null) {
                System.out.println("The file " + testPhoto + " could not be opened, it is not an image");
                return false;
            }
        } catch (IOException e) {
            return false;
        }
        return true;
}-
Else, control returns to
parseUtil.parsePhoto(). It uses the all-parameterPlace()constructor to create aPlaceobject, using thePhotoparameter and other parameters.
A valid filepath must be an absolute file path; it starts with the drive-letter (eg. C:\\), and ends with the file name and extension (eg. castle-photo.jpg).
Supported filepaths are .jpg .png and .bmp, which are filepaths supported by ImageIO.read() and the Java Image class.
|
Step 9: When the select command is executed, the UI component ExpandedPlacePanel receives the Place object. It then uses the photo.filepath attribute to create a
JavaFX Image object, which is then displayed in a ImageView panel at the top of ExpandedPlacePanel using the setImage() method.
Example: Using add to include a photo
Given below is an example usage scenario and what the user will see in the GUI.
Step 1. Input add n/Himeiji Castle cc/JPN dv/15/12/2017 r/5 d/Wow. a/Kyoto t/castle p/C:\Users\Michael\Pictures\castle-photo.jpg
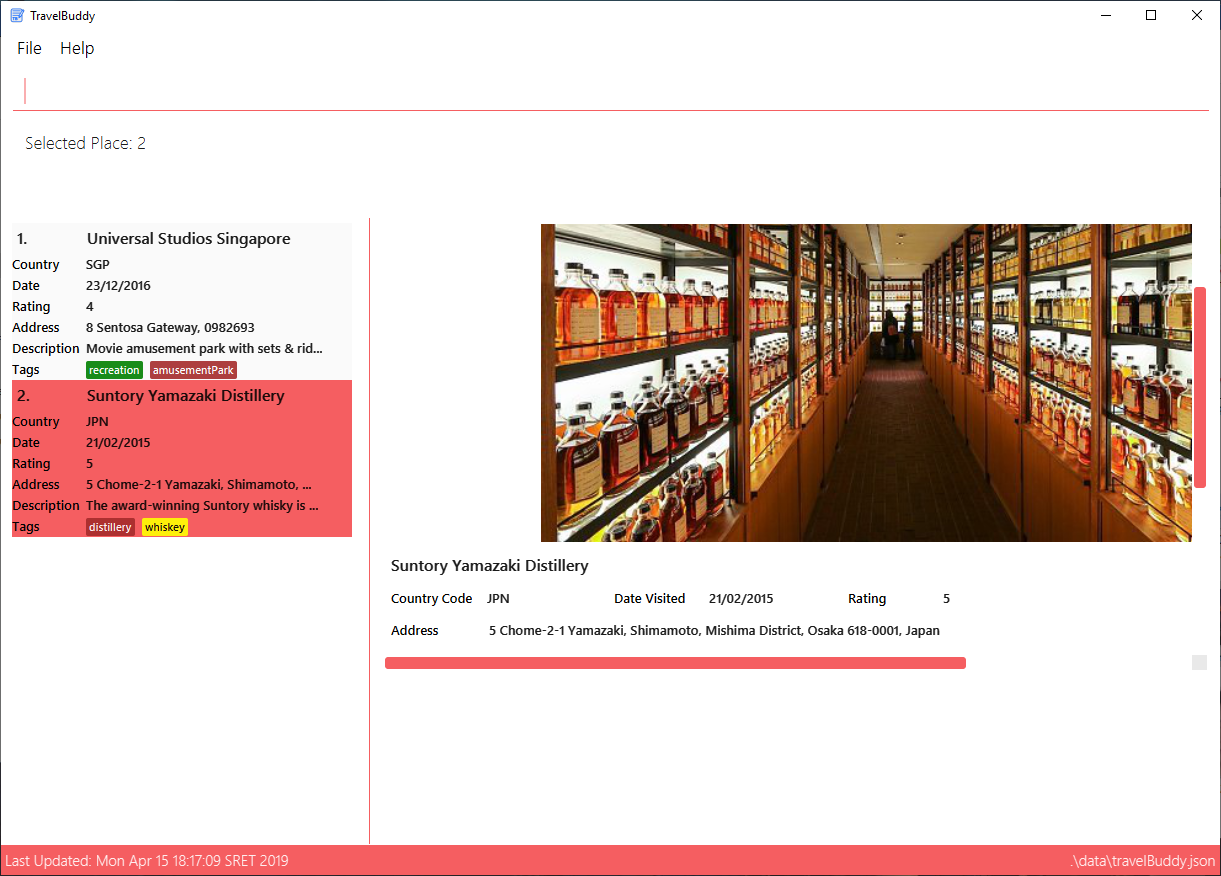
add command is executedStep 2. The user inputs selects 4.
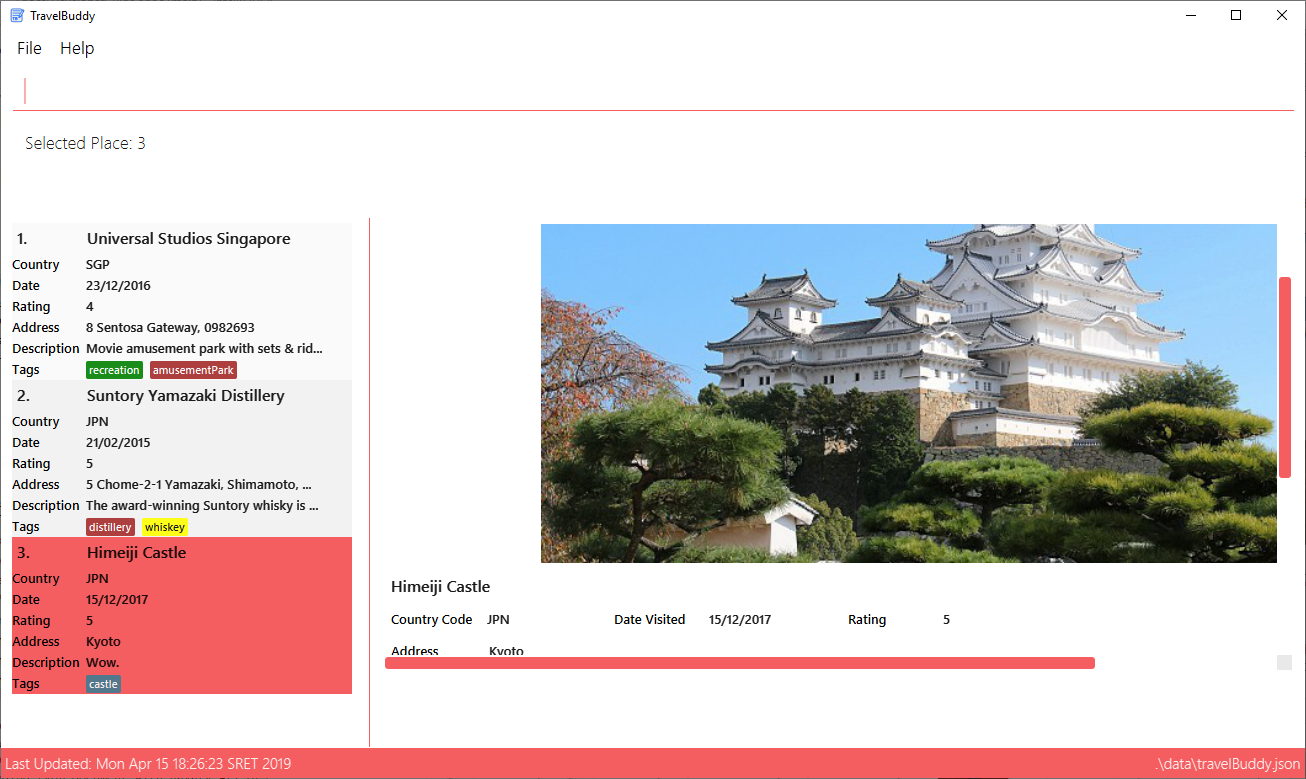
add command is executed and the newly added Place "Himeiji Castle" is selected4.4.2. Design Considerations
Decision: What type of file path input should the add and edit command accept for the photo parameter (prefix p/)?
| Implementation 1: Absolute Filepath (current choice) |
Implementation 2: Filename and Extension Only | |
|---|---|---|
Description |
Accept the entire absolute file path of the image to be added/replaced |
Accept only file name and file extension of the image to be added/replaced, but requiring the images to be located in the directory of the JAR executable, or some other pre-defined directory. |
Pros |
Ease-of-use. This approach is more user friendly when used together with Windows 10 File Explorer |
Scalability. This approach is does not require images to be copied or moved from their existing directory to a new directory. Instead, by using
|
Cons |
Ease-of-use. This approach is less user-friendly as users will have to manually type in the name and extension of each image file added, |
Scalability. For a large number of image files, this approach requires the user spent extra time moving files from their existing directory to
the new pre-specified directory. If moving files is not an option, then addition storage space is required for all the copied files. |
4.5. Chart Feature
The Chart feature displays to users three different charts in TravelBuddy. They are:
-
The Number of Places Visited by Rating Category
-
The Number of Places Visited by Year
-
The Number of Places Visited by Country
The Chart feature is activated in TravelBuddy by default when the application launches. Alternatively, the generate command is also used to generate the charts. The generate command does not require any parameters.
Instead of typing generate, you can simply type the shortcut g.
|
4.5.1. Current Implementation
Logic: The generate mechanism is executed by GenerateCommand, which extends from Command. A code snippet is shown below:
public CommandResult execute(Model model, CommandHistory history) {
    requireNonNull(model);
    model.setChartDisplayed(true); (1)
    model.commitTravelBuddy(); (2)
    if (model.getFilteredPlaceList().isEmpty()) { (3)
        return new CommandResult(MESSAGE_EMPTY);
    } else {
        return new CommandResult(MESSAGE_SUCCESS);
    }
}
In the snippet, the operations implemented are:
-
Model#setChartDisplayed(chartDisplayed)- Signals to the UI to display the charts. -
Model#commitTravelBuddy()- Saves the current TravelBuddy state from its history. -
Model#getFilteredPlaceList()- Verifies if the list is empty.
These operations are exposed in the Model interface as Model#setChartDisplayed(chartDisplayed), Model#commitTravelBuddy() and Model#getFilteredPlaceList().
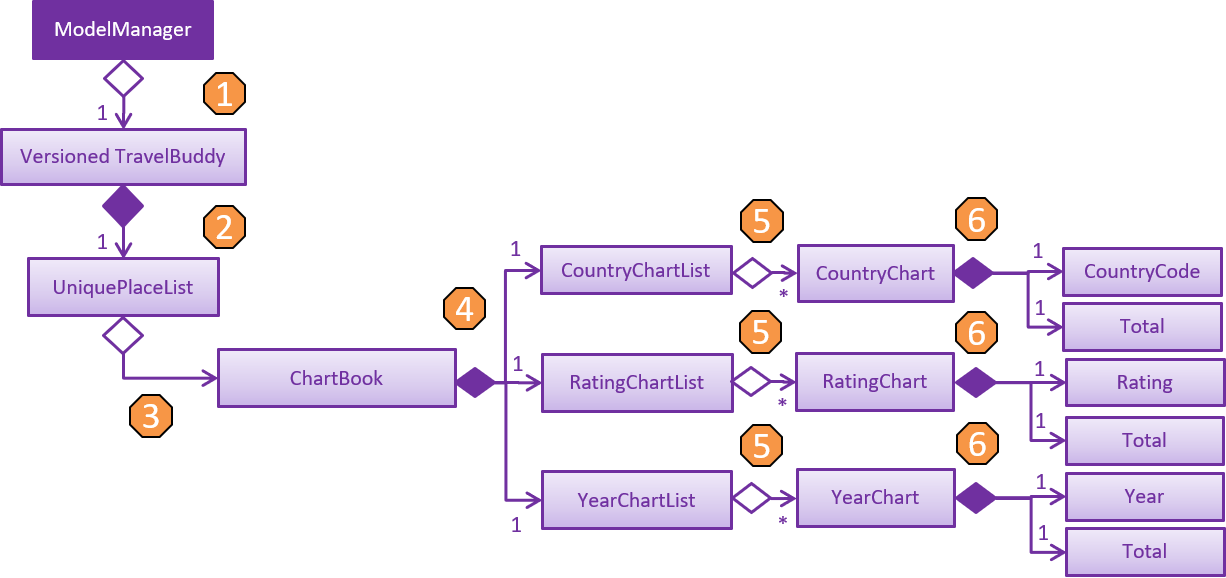
Model: The chart generation mechanism is facilitated by VersionedTravelBuddy, which extends from TravelBuddy, as seen in the Model Class Diagram in Figure 3.4.1.
For this section on Charts, the focus is on the class diagram as seen in Figure 4.5.1.1. The step-by-step explanation of the class diagram can be found below:
-
The
ModelManageris a container for aVersionedTravelBuddyobject. -
VersionedTravelBuddy consists of a
UniquePlaceListobject. -
UniquePlaceListis a container for one or moreChartBookobjects and for one or morePlaceobject. -
ChartBookconsists of aCountryChartListobject, aRatingChartListobject and aYearChartListobject. -
countryChartListis a container for one or moreCountryChartobjects. Similarly,ratingChartListis a container for one or moreRatingChartobjects andyearChartListis a container for one or moreYearChartobjects. -
CountryChartconsists of aCountryCodeobject and aTotalobject. Similarly,RatingChartconsists of aRatingobject and aTotalobject andYearChartconsists of aYearobject and aTotalobject.
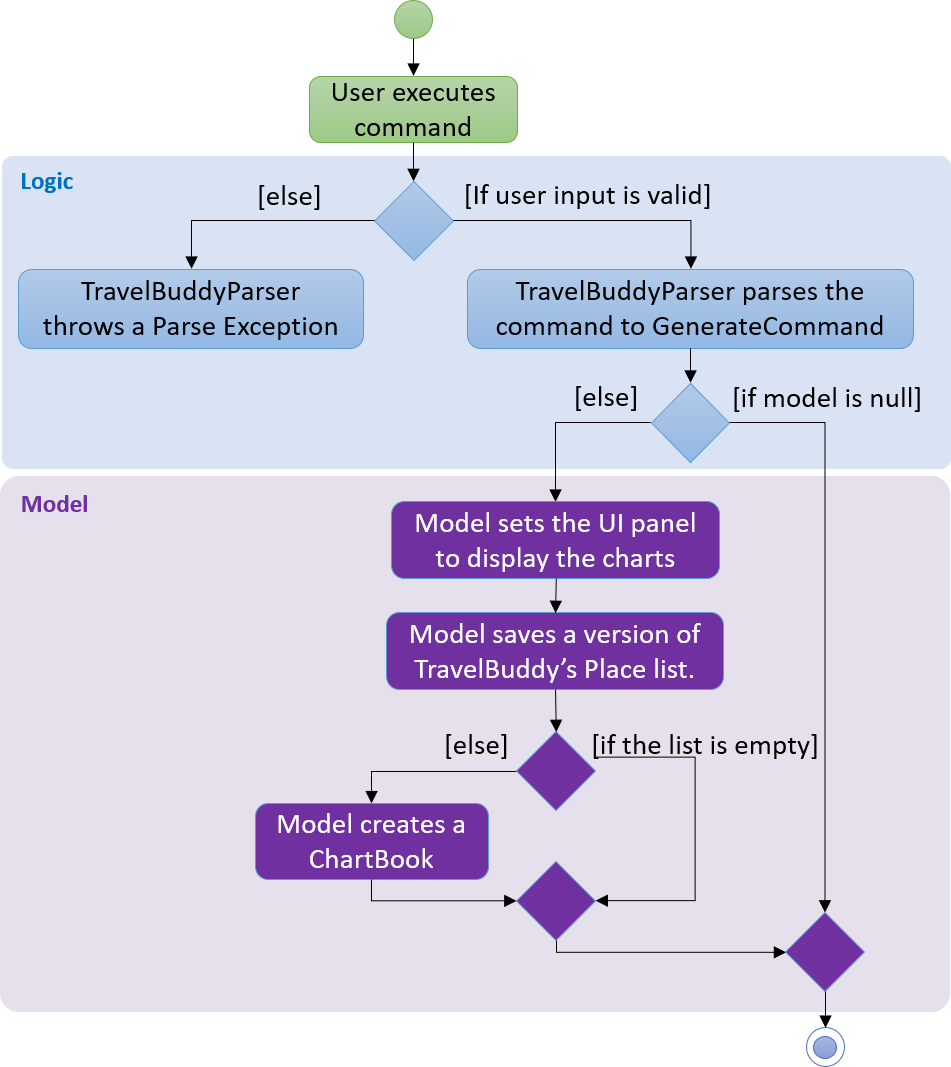
generate commandLogic & Model Interaction: Having discussed Logic and Model, we can now model the workflow of the generate command. This can be accomplished using an activity diagram, as seen in Figure 4.5.1.2.
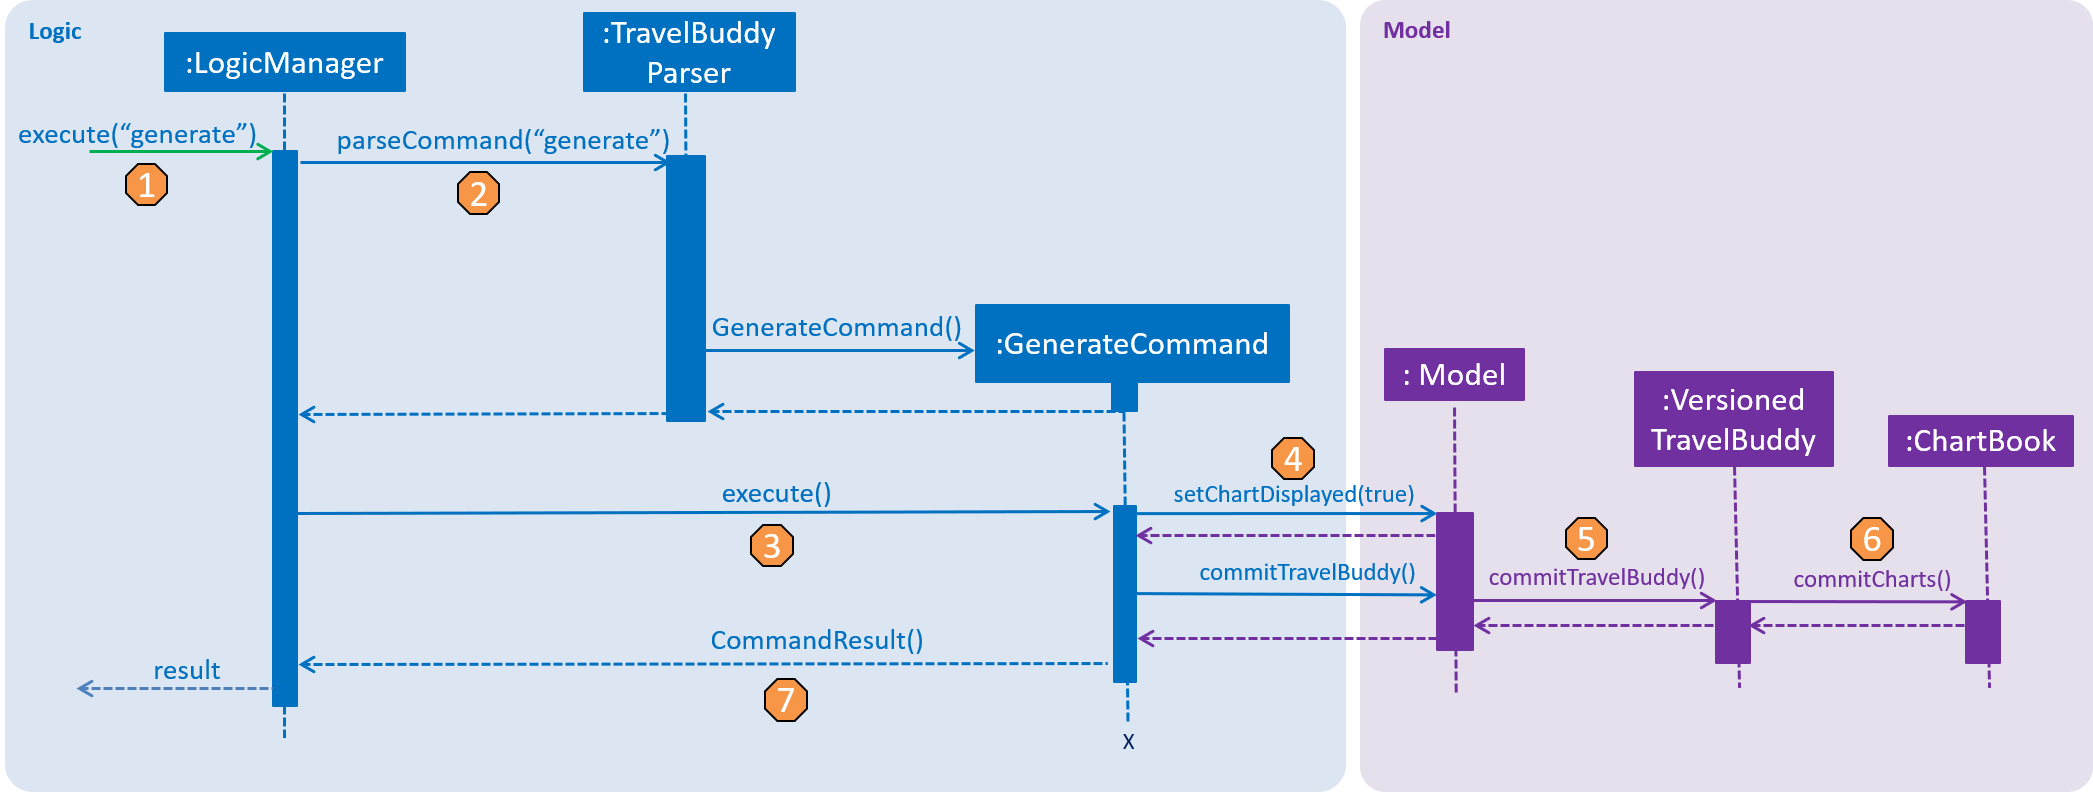
Additionally, we want to be able to capture the interaction between multiple objects for the generate command. This can be accomplished using a sequence diagram, as seen in Figure 4.5.1.3 below. The step-by-step explanation of the sequence diagram is as follows:
-
The user enters the command
generatewithout any parameters. -
The command is processed by the Logic component, which will then call
LogicManager#execute(). -
The
GenerateCommand#execute()method is invoked. -
The
Model#setChartDisplayed()method is invoked with the argumenttrue. TheModel#commitTravelBuddy()method is also invoked. -
The
TravelBuddy#commitTravelBuddy()method is invoked byModel. -
The
ChartBook#commitChart()method is invoked byTravelBuddy. -
The
CommandResultobject is returned.
generate commandStorage: The Chart’s storage is handled by JsonChartBookStorage, which implements from ChartBookStorage. The three main data-storage methods it implements are:
-
saveCountryChart(filePath)- Saves the countries data into a JSON file. -
saveRatingChart(filePath)- Saves the ratings data into a JSON file. -
saveYearChart(filePath)- Saves the years data into a JSON file.
As an example, a code snippet for saveCountryChart(filePath) is shown below. In it, a third-party library called Gson was used to convert Java Objects into JSON and back. The Gson API can be found here. A step-by-step explanation is as follows:
-
saveCountryChartaccepts aReadOnlyCountryChartobject, which supplies data for the Country Chart, and aPathobject, which specifies the file path for theFileWriterto write into. -
Both objects are checked by
requireAllNonNullto make sure they are not empty. -
A
Gsonobject is instantiated using theGsonBuilder#setPrettyPrinting()#create()object. -
A
FileWriterobject is instantiated with thePathobject as its parameter. -
Assuming there are no exceptions,
Gson#toJson()object will serialize theReadOnlyCountryChartdata as aJsonObjectand place the stream onFileWriter. -
The
FileWriter#flush()will flush the stream. -
If an
IOExceptionoccurs, a warning message will be displayed by theLogger#warningobject.
public void saveCountryChart(ReadOnlyCountryChart countryChart, Path filePath) { (1)
    requireAllNonNull(countryChart, filePath); (2)
    Gson gson = new GsonBuilder().setPrettyPrinting().create(); (3)
    try {
        FileWriter fileWriter = new FileWriter(String.valueOf(filePath)); (4)
        gson.toJson(countryChart, fileWriter); (5)
        fileWriter.flush(); (6)
    } catch (IOException ioe) {
        logger.warning(ioe.getMessage()); (7)
    }
}
4.5.2. Generate Command
Preconditions: Given below is a list of preconditions that must be met for the generate command to work:
-
By default, the charts are automatically generated each time TravelBuddy loads.
-
The
generatecommand always triggers the display of all three charts. -
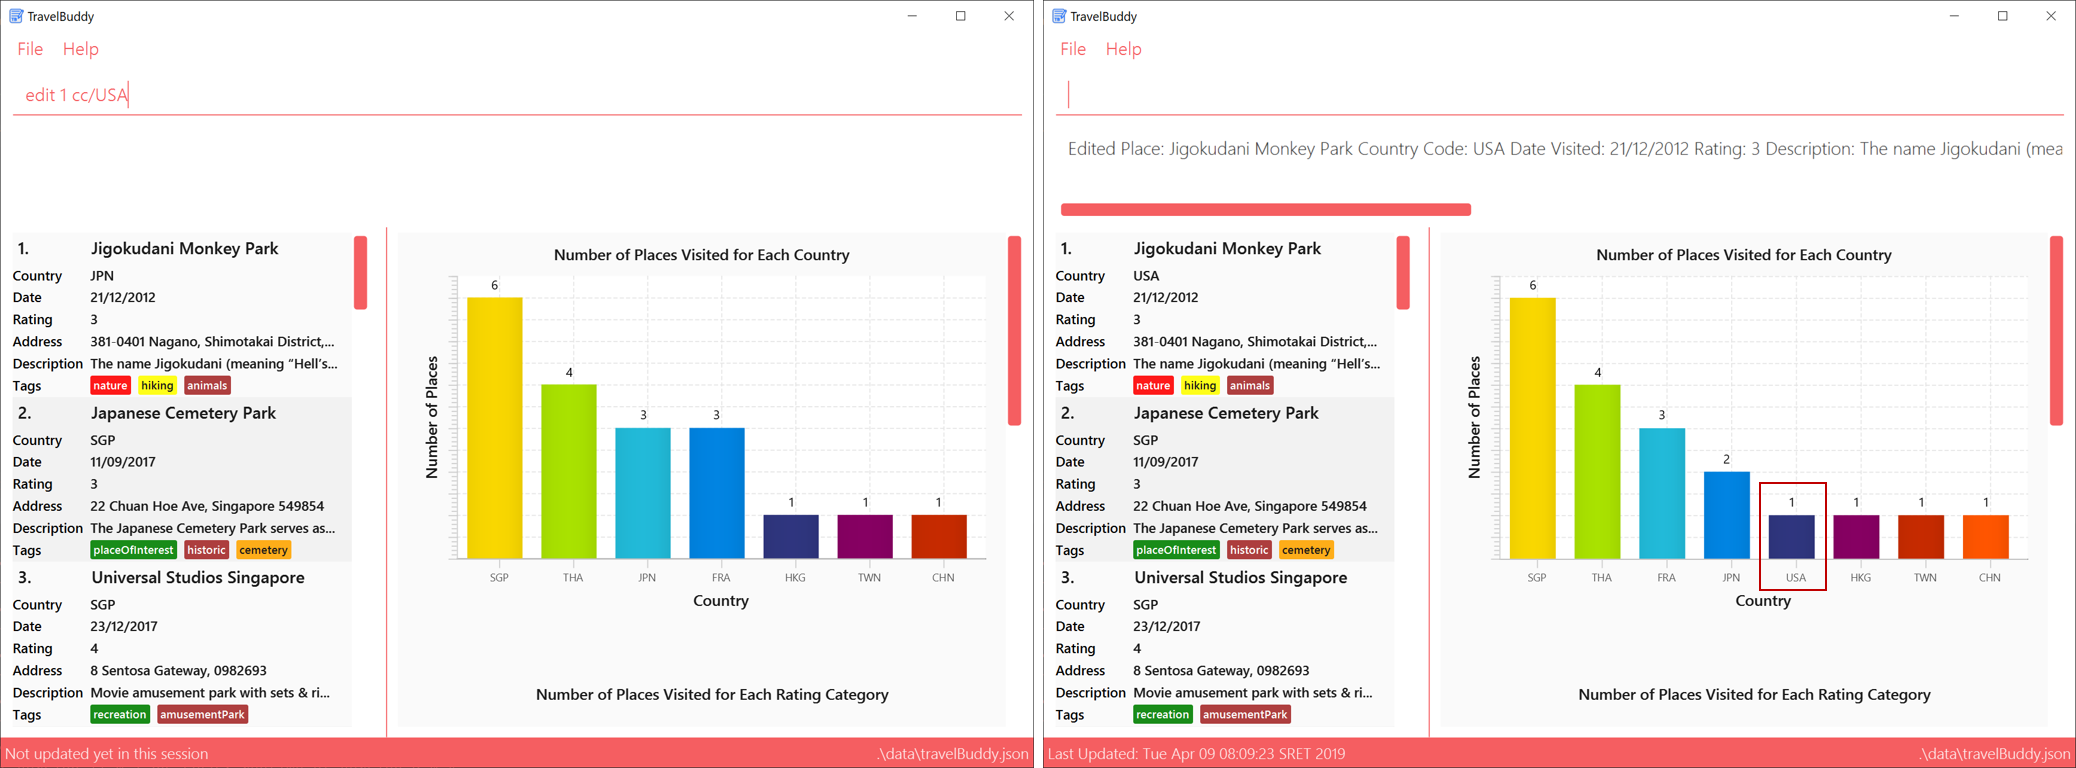
The charts always update themselves in real-time.
Example: When a place is added via theaddcommand, the charts are automatically updated so that nogeneratecommand is necessary. -
The chart will not display anything when the list is empty.
-
You can type in any parameters after the
generatecommand, TravelBuddy will simply ignore them.
Example: Given below is an example usage scenario of the generate command.
Step 1: By default, the charts are displayed when TravelBuddy launches. To navigate away from the charts, type in select 1.
Outcome: The first index in the place list will be selected and displayed on the right-hand side of the panel.
Step 2: Type in generate to generate the charts.
Outcome: The charts will be displayed on the right-hand side of the panel.
4.5.3. Design Considerations
Aspect: How Chart Generation Executes
Given below is a comparison between the alternatives of the generate mechanism design.
| Alternative 1 (current choice) | Alternative 2 | |
|---|---|---|
Description |
Updates the charts both in real-time and when the |
Updates the charts only when the |
Pros |
Ease-of-use. This approach is more user-friendly, as users do not need to type an additional |
Scalability. This approach is computationally less intensive, as the charts are only generated when required. |
Cons |
Scalability. This approach is computationally more intensive, especially when the Place list is huge, as all three charts need to be regenerated every time a change is detected. |
Ease-of-use. This approach is Less user-friendly as users will need to type the |
Example |
As shown in Figure 4.5.3.1, before the |
N.A. |
Decision: Alternative 1, which is to update the charts in real-time, was adopted as it promotes ease-of-use, so users are not required to type in an additional generate command whenever changes are made to the Place list. Moreover, Alternative 1 is the more accurate option of the two, as the chart reflects the latest changes even if the user forgets to type the generate command.
edit command was executed4.6. Logging
We are using java.util.logging package for logging. The LogsCenter class is used to manage the logging levels and
logging destinations.
-
The logging level can be controlled using the
logLevelsetting in the configuration file (See Section 4.7, “Configuration”) -
The
Loggerfor a class can be obtained usingLogsCenter.getLogger(Class)which will log messages according to the specified logging level -
Currently log messages are output through:
Consoleand to a.logfile.
Logging Levels
-
SEVERE: Critical problem detected which may possibly cause the termination of the application -
WARNING: Proceed with caution -
INFO: Information showing the noteworthy actions by the App -
FINE: Details that is not usually noteworthy but may be useful in debugging e.g. print the actual list instead of just its size
4.7. Configuration
Certain properties of the application can be controlled (e.g user prefs file location, logging level) through the
configuration file (default: config.json).
5. Documentation
We use asciidoc for writing documentation.
| We chose asciidoc over Markdown because asciidoc, although a bit more complex than Markdown, provides more flexibility in formatting. |
5.1. Editing Documentation
See UsingGradle.adoc to learn how to render .adoc files locally to
preview the end result of your edits. Alternatively, you can download the AsciiDoc plugin for IntelliJ, which allows
you to preview the changes you have made to your .adoc files in real-time.
5.2. Publishing Documentation
See UsingTravis.adoc to learn how to deploy GitHub Pages using Travis.
5.3. Converting Documentation to PDF Format
We use Google Chrome for converting documentation to PDF format, as Chrome’s PDF engine preserves hyperlinks used in webpages.
Here are the steps to convert the project documentation files to PDF format.
-
Follow the instructions in UsingGradle.adoc to convert the AsciiDoc files in the
docs/directory to HTML format. -
Go to your generated HTML files in the
build/docsfolder, right click on them and selectOpen with→Google Chrome. -
Within Chrome, click on the
Printoption in Chrome’s menu. -
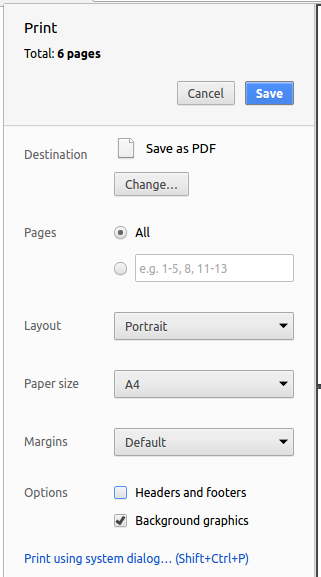
Set the destination to
Save as PDF, then clickSaveto save a copy of the file in PDF format. For best results, use the settings indicated in the screenshot below.
5.4. Site-wide Documentation Settings
The build.gradle file specifies some project-specific asciidoc attributes which affects how all documentation files within this project
are rendered.
Attributes left unset in the build.gradle file will use their default value, if any.
|
| Attribute name | Description | Default value |
|---|---|---|
|
The name of the website. If set, the name will be displayed near the top of the page. |
not set |
|
URL to the site’s repository on GitHub. Setting this will add a "View on GitHub" link in the navigation bar. |
not set |
|
Define this attribute if the project is an official SE-EDU project. This will render the SE-EDU navigation bar at the top of the page, and add some SE-EDU-specific navigation items. |
not set |
5.5. Per-file Documentation Settings
Each .adoc file may also specify some file-specific asciidoc
attributes which affects how the file is rendered.
Asciidoctor’s built-in attributes may be specified and used as well.
Attributes left unset in .adoc files will use their default value, if any.
|
| Attribute name | Description | Default value |
|---|---|---|
|
Site section that the document belongs to.
This will cause the associated item in the navigation bar to be highlighted.
One of: * Official SE-EDU projects only |
not set |
|
Set this attribute to remove the site navigation bar. |
not set |
5.6. Site Template
The files in docs/stylesheets are the CSS stylesheets of the site.
You can modify them to change some properties of the site’s design.
The files in docs/templates controls the rendering of .adoc files into
HTML5.
These template files are written in a mixture of Ruby and Slim.
|
Modifying the template files in |
6. Testing
6.1. Running Tests
There are three ways to run tests.
| The most reliable way to run tests is the 3rd one. The first two methods might fail some GUI tests due to platform/resolution-specific idiosyncrasies. |
Method 1: Using IntelliJ JUnit test runner
-
To run all tests, right-click on the
src/test/javafolder and chooseRun 'All Tests' -
To run a subset of tests, you can right-click on a test package, test class, or a test and choose
Run 'ABC'
Method 2: Using Gradle
-
Open a console and run the command
gradlew clean allTests(Mac/Linux:./gradlew clean allTests)
| See UsingGradle.adoc for more info on how to run tests using Gradle. |
Method 3: Using Gradle (headless)
Thanks to the TestFX library we use, our GUI tests can be run in the headless mode. In the headless mode, GUI tests do not show up on the screen. That means the developer can do other things on the Computer while the tests are running.
To run tests in headless mode, open a console and run the command gradlew clean headless allTests (Mac/Linux: ./gradlew clean headless allTests)
6.2. Types of Tests
We have two types of tests:
-
GUI Tests - These are tests involving the GUI. They include,
-
System Tests that test the entire App by simulating user actions on the GUI. These are in the
systemtestspackage. -
Unit tests that test the individual components. These are in
seedu.travel.uipackage.
-
-
Non-GUI Tests - These are tests not involving the GUI. They include,
-
Unit tests targeting the lowest level methods/classes.
e.g.seedu.travel.commons.StringUtilTest -
Integration tests that are checking the integration of multiple code units (those code units are assumed to be working).
e.g.seedu.travel.storage.StorageManagerTest -
Hybrids of unit and integration tests. These test are checking multiple code units as well as how the are connected together.
e.g.seedu.travel.logic.LogicManagerTest
-
6.3. Troubleshooting Testing
Problem: HelpWindowTest fails with a NullPointerException.
-
Reason: One of its dependencies,
HelpWindow.htmlinsrc/main/resources/docsis missing. -
Solution: Execute Gradle task
processResources.
7. Dev Ops
7.1. Build Automation
See UsingGradle.adoc to learn how to use Gradle for build automation.
7.2. Continuous Integration
We use Travis CI and AppVeyor to perform Continuous Integration on our projects. See UsingTravis.adoc and UsingAppVeyor.adoc for more details.
7.3. Coverage Reporting
We use Coveralls to track the code coverage of our projects. See UsingCoveralls.adoc for more details.
7.4. Documentation Previews
When a pull request has changes to asciidoc files, you can use Netlify to see a preview of how the HTML version of those asciidoc files will look like when the pull request is merged. See UsingNetlify.adoc for more details.
7.5. Making a Release
Here are the steps to create a new release.
-
Update the version number in
MainApp.java. -
Generate a JAR file using Gradle.
-
Tag the repo with the version number. e.g.
v0.1 -
Create a new release using GitHub and upload the JAR file you created.
7.6. Managing Dependencies
A project often depends on third-party libraries. For example, TravelBuddy depends on the Jackson library for JSON parsing. Managing these dependencies can be automated using Gradle. For example, Gradle can download the dependencies automatically, which is better than these alternatives:
-
Include those libraries in the repo (this bloats the repo size)
-
Require developers to download those libraries manually (this creates extra work for developers)
Appendix A: Product Scope
Target user profile: The target audience that we have identified are stated below.
-
The user has a need to manage a significant number of places
-
The user prefers desktop apps over other types
-
The user can type fast
-
The user prefers typing over mouse input
-
The user is reasonably comfortable using CLI apps
Value proposition: Manage contacts faster than a typical mouse/GUI driven app
Appendix B: User Stories
The priority of user stories are divided into three categories:
-
High (must have) -
* * * -
Medium (nice to have) -
* * -
Low (unlikely to have) -
*
| Priority | As a … | I want to … | So that … |
|---|---|---|---|
|
user |
search places by their names |
I can quickly retrieve information about that place |
|
user |
keep track of all the places I have visited |
I can easily search for them in the future |
|
user |
rate the places I have visited |
I know which places I want to revisit |
|
user |
be able to search for places by ratings |
I can recommend the highly-rated places to others and avoid the lowly-rated ones |
|
user |
be able to search for places by countries |
I can plan for future trips |
|
user |
search places by their tag(s) |
I can quickly compile a list of places with related tags |
|
user |
know the countries and continents that I have not visited |
I may visit them in future |
|
user |
see a graphical representation of the places I have visited |
I can plan which country to visit next |
|
user |
to know the number of times I have revisited a place |
I know which places are popular for me |
|
user |
search for the places I have visited by years |
I am able to see which places I have visited in by year |
|
user |
have a map view indicating all of the places I have visited |
I can quickly find out the places by countries I have visited in a user-friendly way |
|
user |
I want to get the locations of highly-rated places in my vicinity |
find a place to visit |
Appendix C: Use Cases
For all use cases below, the System is the TravelBuddy and the Actor is the user,
unless specified otherwise.
Use case: Deleting a place
-
User requests to list places
-
TravelBuddy shows a list of places
-
User requests to delete a specific place in the list
-
TravelBuddy deletes the place
Use case ends.
-
2a. The list is empty.
Use case ends.
-
3a. The given index is invalid.
-
3a1. TravelBuddy shows an error message "The place index provided is invalid".
Use case resumes at step 2.
-
-
3b. The given command is invalid.
-
3b1. TravelBuddy shows an error message "Unknown command".
Use case resumes at step 2.
-
Use case: Search for a place
-
User requests to list places
-
TravelBuddy shows a list of places
-
User searches for a place with a specific word
-
TravelBuddy displays all places with the specified word.
Use case ends.
-
2a. The list is empty.
Use case ends.
-
3a. The given word is not found.
-
3a1. TravelBuddy shows an error message "0 places listed!".
Use case resumes at step 2.
-
-
3b. The given command is invalid.
-
3b1. TravelBuddy shows an error message "Unknown command".
Use case resumes at step 2.
-
Use case: Edits a place
-
User requests to list places
-
TravelBuddy shows a list of places
-
User edits a place with a specified index and a specified parameter.
-
TravelBuddy identifies the place and updates the changes on the specified parameter.
Use case ends.
-
2a. The list is empty.
Use case ends.
-
3a. The given index is invalid.
-
3a1. TravelBuddy shows an error message "Invalid command format!".
Use case resumes at step 2.
-
-
3b. The given prefix is invalid.
-
3b1. TravelBuddy shows an error message "Invalid command format!".
Use case resumes at step 2.
-
-
3c. The given parameter is invalid.
-
3c1. TravelBuddy shows an error message depending on the parameter.
Use case resumes at step 2.
-
-
3d. The given command is invalid.
-
3d1. TravelBuddy shows an error message "Unknown command".
Use case resumes at step 2.
-
Appendix D: Non-Functional Requirements
The non-functional requirements of the system are listed below:
-
Operating System (OS) Compatability: Should work on any mainstream OS as long as it has Java
9or higher installed. -
Storage Requirements: Should store up to 1,000 places without a noticeable sluggishness in performance for typical usage.
-
Usage Efficiency: A user with above average typing speed for regular english text (i.e. not code, not system admin commands) should be able to accomplish most of the tasks faster using commands than using the mouse.
-
Constraints: Should be backward compatible with data produced by earlier versions of the system;
-
Technical Requirements: Should work on both 32-bit and 64-bit environments.
-
Speed Requirements: Should respond within two seconds.
-
Quality Requirements: Should be usable by a novice who has never used a travel log
Appendix E: Glossary
| Terms | Definitions |
|---|---|
Activity diagrams are diagrams that can model workflows. Activity diagrams are the UML equivalent of flow charts. |
|
An actor (in a use case) is a role played by a user. An actor can be a human or another system. Actors are not part of the system; they reside outside the system. |
|
Class diagrams describe the structure (but not the behavior) of an OOP solution. |
|
Extensions are "add-on"s to the MSS that describe exceptional or alternative flow of events. They describe variations of the scenario that can happen if certain things are not as expected by the MSS. |
|
Integrated Development Environment (IDE) is a software application that provides comprehensive facilities to computer programmers for software development. |
|
Java Development Kit (JDK) is a software development environment used for developing Java applications and applets. |
|
Some mainstream operating systems include Windows, Linux, Unix and OS-X. |
|
Main Success Scenario (MSS) describes the most straightforward interaction for a given use case, which assumes that nothing goes wrong. |
|
Sequence diagrams capture the interactions between multiple objects for a given scenario. |
|
A use case is a description of a set of sequences of actions, including variants, that a system performs to yield an observable result of value to an actor. |
|
User stories are short, simple descriptions of a feature told from the perspective of the person who desires the new capability, usually a user or customer of the system. |
Appendix F: Instructions for Manual Testing
Given below are instructions to test the app manually.
| These instructions only provide a starting point for testers to work on. Testers are expected to do more exploratory testing. |
Launching and Shutdown
-
Initial launch
-
Download the jar file and copy into an empty folder
-
Double-click the jar file
Expected: Shows the GUI with a set of sample contacts. The window size may not be optimum.
-
-
Saving window preferences
-
Resize the window to an optimum size. Move the window to a different location. Close the window.
-
Re-launch the app by double-clicking the jar file.
Expected: The most recent window size and location is retained.
-
Deleting a Place
-
Deleting a place while all places are listed
-
Prerequisites: List all places using the
listcommand. Multiple places in the list. -
Test case:
delete 1
Expected: First contact is deleted from the list. Details of the deleted contact shown in the status message. Timestamp in the status bar is updated. -
Test case:
delete 0
Expected: No place is deleted. Error details shown in the status message. Status bar remains the same. -
Other incorrect delete commands to try:
delete,delete x(where x is larger than the list size)
Expected: Similar to previous.
-
